Using words thoughtfully!

  The importance of using words thoughtfully:

  The Power of Our Words:

  Why Thoughtful Communication Matters
In our fast-paced world, where tweets fly and instant messages abound, it’s easy to forget the profound impact of the words we choose.

  I write of this because one carelessly chosen word upended our little corner of the world. My attempts to correct said mistake made matters even worse, and it would seem impossible to now correct. I share this in hopes of helping someone else avoid a similar mistake.

  If perhaps you misspeak or use an ill-fitting word, try not to take offense at someone for calling you out over it, especially if it’s someone that you care about. You never know how your choice of words will be received, no matter how well intended.

  This has nothing to do with homesteading, I can almost hear you saying.

  And for the most part, you’d be right. However, one wrong word can blow up and become a disagreement and turn into a long series of words that once said can not be taken back and the damage caused irreparable. Especially if you’re a dunderhead like me, and wreck what you thought you knew would one day be.

  We might dash off a quick email, fire back a sarcastic comment, or post a fleeting thought online without a second’s hesitation.

  But just like a stone dropped into a pond, our words create ripples – and those ripples can extend far beyond our immediate perception.

  That’s why thoughtful communication isn’t just a nice-to-have; it’s an essential skill, a cornerstone of strong relationships, effective leadership, and a more compassionate world.

  More Than Just Letters: The True Nature of Words
Words are not merely combinations of letters. They are:
* Vessels of emotion: They carry our joy, our anger, our empathy, and our frustration.
* Builders of bridges (or walls): They can foster understanding and connection, or they can create division and animosity.
* Seeds of ideas: They can inspire, motivate, and educate, shaping perspectives and igniting change.
* Reflections of ourselves: The way we speak and write reveals much about our character, our values, and our respect for others.
The Ripple Effect: Why Thoughtfulness Pays Off
When we take the time to consider our words before we utter or type them, we unlock a multitude of benefits:
* Stronger Relationships: Clear, empathetic, and respectful communication builds trust and strengthens bonds with friends, family, and colleagues. Misunderstandings decrease, and genuine connection flourishes.
* Enhanced Credibility and Influence: When you speak thoughtfully and articulately, you project confidence and competence. People are more likely to listen to you, trust your judgment, and be influenced by your ideas.
* Conflict De-escalation: Many conflicts arise from miscommunication or poorly chosen words. Thoughtful language, especially during disagreements, can de-escalate tension and pave the way for constructive solutions.
* Reduced Regret: How many times have we wished we could take back something we said in haste? Taking a moment to pause and reflect can save us from future regret and the need for apologies.
* Greater Impact: Whether you’re writing a report, giving a presentation, or simply offering encouragement, well-chosen words have more power to resonate and create lasting impact.
* Personal Growth: The discipline of thoughtful communication encourages us to listen more, empathize better, and express ourselves with greater clarity and precision – all valuable traits for personal development.
How to Cultivate Thoughtful Communication
So, how can we become more mindful communicators? It’s a practice, not a destination:
* Pause Before You Pounce: Before you respond, comment, or send, take a breath. Ask yourself: Is this necessary? Is it kind? Is it true? Is it helpful?
* Consider Your Audience: Who are you speaking to? What is their perspective? How might your words be received by them?
* Choose Your Tone Wisely: Your tone, whether in person or in text, conveys as much as your words themselves. Aim for respectful, calm, and understanding.
* Embrace Empathy: Try to understand the other person’s feelings and intentions. Frame your words in a way that acknowledges their perspective.
* Be Specific and Clear: Ambiguity leads to confusion. Strive for clarity and precision in your language.
* Proofread (for written communication): A quick review can catch errors and ensure your message is accurately conveyed.
* Listen Actively: Thoughtful communication is a two-way street. Truly listening to understand, rather than just waiting to respond, is paramount.

  In a world overflowing with noise, let’s strive to contribute clarity, kindness, and meaning. Every word we use is an opportunity to build, to connect, and to make a positive difference. Let’s make those opportunities count.

  What are your thoughts on the power of words? Please share your experiences in the comments below!

New mower

Ryobi 18V ONE+ HP Brushless 20″ Self-Propelled Mower (Model PBLLM05):

Our new mower.

  Power and Convenience in the ONE+ Family: Exploring the Ryobi 18V HP Brushless 20″ Self-Propelled Mower (PBLLM05)

It came with two batteries and chargers.

  For homeowners invested in the Ryobi ONE+ ecosystem seeking a powerful, convenient, and battery-powered solution for their lawn care, the Ryobi 18V ONE+ HP Brushless 20″ Self-Propelled Mower (Model PBLLM05) stands out as a versatile and user-friendly option. Leveraging the popular ONE+ battery platform, this mower combines the benefits of cordless convenience with the added power of a brushless motor and the ease of self-propulsion.

  Let’s take a closer look at what makes this mower a valuable addition to your yard care arsenal.
The Power of ONE+ Meets HP Brushless Technology
At the heart of the PBLLM05 lies Ryobi’s 18V ONE+ system and their HP™ brushless motor technology. This combination offers a compelling set of advantages:
* Cordless Convenience: Enjoy the freedom of movement without the constraints of cords or the hassle of gasoline. Simply pop in a charged ONE+ battery and you’re ready to mow.
* Brushless Efficiency: The HP brushless motor delivers enhanced power, longer runtime, and increased motor life compared to traditional brushed motors. This means efficient cutting performance and a mower built to last.
* ONE+ System Compatibility: As part of the expansive Ryobi ONE+ family, this mower is compatible with all Ryobi 18V ONE+ batteries. If you already own other ONE+ tools, you can use your existing batteries, making it a cost-effective addition.

  While batteries and chargers are often sold separately with the bare tool (PBLLM05), various kits are available that include them, providing a complete mowing solution right out of the box. Ours came with two batteries and chargers.

  Effortless Mowing with Self-Propulsion
One of the key features of the PBLLM05 is its self-propelled system. This takes the physical strain out of mowing, especially on uneven terrain or larger lawns.

  With a simple engagement of the drive control, the mower assists you, matching your walking pace. This feature makes lawn care more comfortable and less tiring.

  Versatile Cutting Performance with a 20-Inch Deck
The PBLLM05 features a 20-inch cutting deck, a size that offers a great balance between maneuverability in tighter areas and efficient coverage of larger spaces. It typically offers 3-in-1 functionality, allowing you to:
* Bag: Collect grass clippings in the rear bag for a clean and polished look.
* Mulch: Finely chop clippings and return them to the lawn as a natural fertilizer, promoting healthy growth and reducing the need for chemical fertilizers.
* Side Discharge: Expel clippings to the side, which is useful for longer grass or when you prefer not to bag or mulch.

  Switching between these modes is usually a simple process involving adjustments to the discharge chute and bag attachment.

  The mower also includes a single-point height adjustment, allowing you to easily choose from multiple cutting heights (typically ranging from 1.5 to 4 inches) to suit your lawn’s needs and the season.

  Smart Features for an Easier Mow
The Ryobi 18V HP Brushless 20″ Self-Propelled Mower often incorporates smart features to enhance the user experience:
* Load-Sensing Technology: The mower intelligently senses the thickness of the grass and adjusts the motor’s power output accordingly, optimizing runtime and cutting performance.
* Onboard Battery Storage (on some models/kits): Some versions may include convenient onboard storage for a second battery, allowing for quick swaps and extended mowing sessions. ( our will hold four at a time.
* LED Headlights (on some models/kits): Integrated LED headlights can improve visibility when mowing in low-light conditions, such as early evening or shaded areas. Sadly we didn’t get the headlights, oh well.
* Folding Handles: The handles are designed to fold down easily, making storage more compact and saving valuable space in your garage or shed.
* Quieter Operation: Compared to gasoline-powered mowers, the 18V battery-powered operation is significantly quieter, contributing to a more peaceful mowing experience.
Pros and Cons at a Glance
Pros:
* Cordless convenience powered by the versatile Ryobi ONE+ battery system.
* HP Brushless motor for enhanced power, runtime, and durability.
* Self-propelled drive for effortless mowing.
* Versatile 3-in-1 mulching, bagging, and side discharge capabilities.
* Single-point height adjustment for easy cutting height selection.
* Load-sensing technology for optimized performance and runtime.
* Often includes foldable handles for compact storage.
* Quieter operation compared to gas mowers.
* Zero emissions, making it an environmentally friendly choice.
Cons:
* Runtime is dependent on the battery size used and grass conditions.
* May require multiple passes for very thick or overgrown grass.
* Initial cost of the bare tool might require purchasing batteries and chargers separately if you’re not already in the ONE+ system.
The Verdict: A Powerful and Convenient Choice for ONE+ Users
The Ryobi 18V ONE+ HP Brushless 20″ Self-Propelled Mower (PBLLM05) offers a fantastic combination of power, convenience, and compatibility for homeowners already invested in the Ryobi ONE+ system. Its brushless motor provides ample cutting power, while the self-propulsion makes mowing easier and less tiring.

  The 20-inch deck offers a good balance of maneuverability and cutting efficiency, and the 3-in-1 functionality adds to its versatility. If you’re looking for a reliable and user-friendly battery-powered mower that integrates seamlessly with your existing Ryobi ONE+ tools, the PBLLM05 is definitely worth considering.

  Below is an unboxing and short review of what we purchased. When it’s all said and done, the batteries will be charged with solar.

https://youtu.be/NwtkAAsdMMc?si=hWJfu3vf_XG9_WTn

A 100 amp charge controller.

  I’d played around with our solar for a while now, and it just keeps getting more and more serious all the time.

  So I got us an off brand 100 amp charge controller. It seems to work well enough, as the power wall nears completion that may well change. It will be comparable to a Tesla power wall weighing in at 5.3Kw. I may wish I’d purchased a big brand name one, but for now, this will work.

One of our charge controllers.

  If you are new to solar or just getting started with it, there are plenty of books and videos on the subject to help you learn. Facebook has groups for beginners as well, but be forewarned. Many of these groups are filled with less than desirable people when it comes to answering questions by noobs.


Unleash the Full Power of the Sun: Diving into 100A MPPT Solar Charge Controllers
So, you’re serious about harnessing the sun’s energy? Excellent choice! As your solar system grows, you’ll inevitably encounter the need for more robust and efficient components. Enter the 100A MPPT solar charge controller – a powerhouse device that can significantly boost the performance of your off-grid or hybrid solar setup.
But what exactly is a 100A MPPT charge controller, and why might you need one? Let’s dive in and explore the key benefits and considerations of these impressive pieces of solar technology.
Decoding the Acronym: MPPT Explained
First things first, let’s break down “MPPT.” It stands for Maximum Power Point Tracking. Unlike simpler PWM (Pulse Width Modulation) controllers, an MPPT controller intelligently seeks the optimal voltage and current combination from your solar panels to maximize the power they deliver to your batteries. Think of it as a smart energy optimizer constantly fine-tuning the connection between your panels and your battery bank.
Why 100 Amps? Power and Scalability
The “100A” designation refers to the maximum charging current the controller can handle. This high current capacity makes 100A MPPT controllers ideal for:
* Larger Solar Arrays: If you have a significant number of solar panels wired in parallel, a 100A controller can efficiently manage the higher current output.
* Higher Voltage Battery Banks: These controllers often support a wide range of battery voltages (12V, 24V, 48V, and sometimes even higher), making them versatile for different system configurations.
* Faster Battery Charging: A higher charging current translates to quicker replenishment of your battery bank, especially crucial for off-grid living or situations with high energy demands.
* Future-Proofing: Investing in a 100A controller now can provide headroom for future expansion of your solar array without needing to replace the charge controller.
Key Advantages of a 100A MPPT Solar Charge Controller:
* Increased Energy Harvest: The intelligent MPPT technology can yield up to 10-30% more energy from your solar panels compared to PWM controllers, especially in suboptimal conditions like partial shading or varying temperatures.
* Efficient Charging: By constantly tracking the maximum power point, these controllers ensure your batteries receive the most efficient charge, prolonging their lifespan and maximizing their capacity.
* Versatility: Many 100A MPPT controllers offer compatibility with various battery types (lead-acid, lithium-ion, etc.) and allow for customizable charging profiles.
* Advanced Features: Often equipped with features like built-in protections (overcharge, over-discharge, reverse polarity), data logging, and remote monitoring capabilities, providing valuable insights into your system’s performance.
* Scalability: As mentioned earlier, a 100A controller provides a solid foundation for expanding your solar power system in the future.
Things to Consider Before You Buy:
* Solar Array Size and Configuration: Ensure your solar panel output is compatible with the controller’s voltage and current ratings. Overpowering or undervolting can lead to inefficiency or damage.
* Battery Bank Voltage and Capacity: The controller must be compatible with your battery bank’s voltage. Also, consider the charging current relative to your battery capacity to avoid overcharging.
* System Requirements: Think about your energy needs and whether a 100A controller is truly necessary. For smaller systems, a lower-amperage controller might suffice.
* Budget: 100A MPPT controllers are generally more expensive than PWM controllers or lower-amperage MPPT models. Weigh the cost against the long-term benefits and increased energy production.
* Features and Functionality: Consider features like remote monitoring, data logging, temperature compensation, and communication protocols based on your specific needs.
* Brand Reputation and Warranty: Opt for reputable brands known for quality and reliability, and check the warranty offered.
In Conclusion:
A 100A MPPT solar charge controller is a powerful and intelligent component that can significantly enhance the efficiency and performance of mid-to-large-sized solar power systems. While it represents a larger investment, the increased energy harvest, faster charging times, and potential for future expansion make it a worthwhile consideration for those serious about maximizing their solar energy potential. By carefully considering your system requirements and the features offered, you can choose the perfect 100A MPPT controller to unlock the full power of the sun for your energy needs.
Ready to take your solar journey to the next level? A 100A MPPT charge controller might just be the key!

Update for the solar system

  Turns out my battries are junk, at least for using them to run anything. I could probably use them to run some LEDS or something small.

  But sadly, they have bad cells, and apparently, I need a new battery tester.

  According to mine they are good but need recharged, which I thought was odd since they are hooked up to the solar panels.

  However, when I started to use the washing machine it must have pushed them over the edge because with a good battery tester that I’d borrowed show dead cells in each battery.

  Oh well, such is life. Expand a little and figure out what you need to keep it going forward. I have a couple of 100ah lifepo4 battries coming. With them, I should be able to wash and hopefully dry the clothes when they can’t be hung out on the line.

  I also have a lot of 3.2 volt lifepo4 batteries that I’d bought as used, however they appear new, which may sound like a great deal.

  However, it also means the lugs are not threaded, and there is no way to connect the cells together to make 12 volt battries as I’d intended to do.

  It’s recommended that lugs be laser welded on. However I don’t know that there is anyone anywhere close to here that had one, and I’m not spending thousands of dollars to buy one.

  I’m going to try to figure out a way to clamp them down or perhaps spot weld something onto them.

  Anyway, that is a story for another time. I’ll update you as that as I make progress on it.

  Tonight’s post is short, I’m tired and need sleep. Thank you for stopping by.

The humble sunchoke

  I had thought I would post every day for a year but have decided that I will take Sundays off instead.

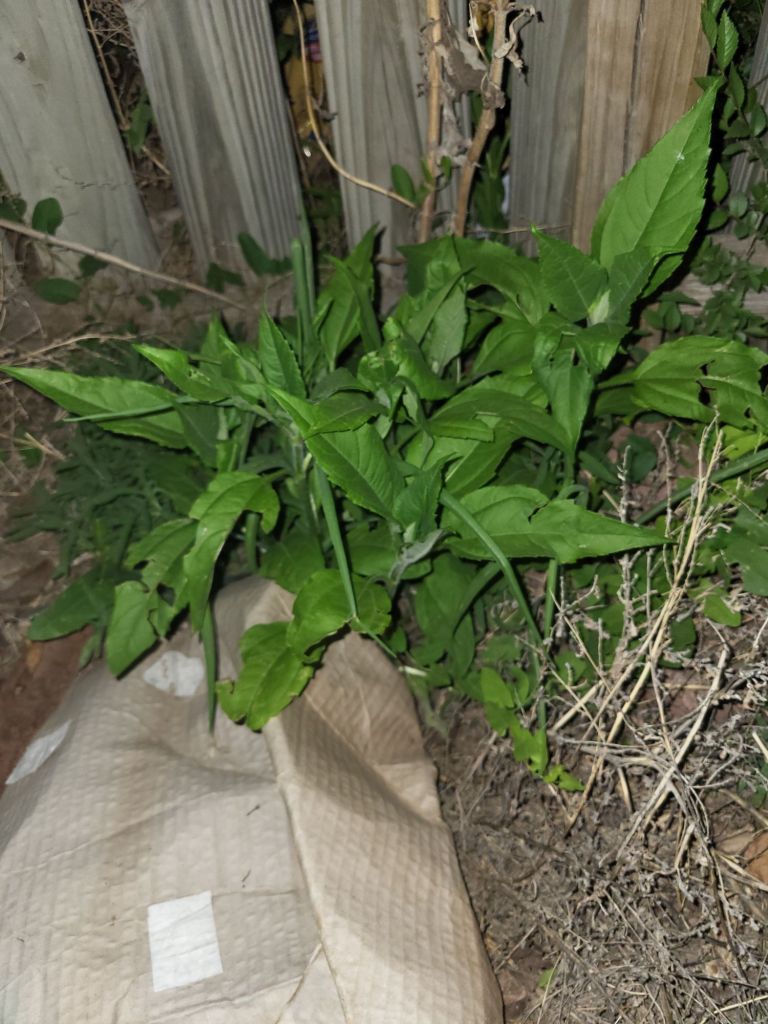
I need to flatten the cardboard back down, but this is our small patch of sunchoke.

  Above is our small patch, they spung up about a foot away from where we’d planted the tubers last season. These will be a great addition to our food forest.

  A Gardener’s Delight and Culinary gem.

  Have you ever encountered a vegetable that’s both easy to grow and incredibly versatile in the kitchen?

  Let me introduce you to the Jerusalem artichoke, also known as the sunchoke.

  Despite its name, it has nothing to do with Jerusalem or artichokes! This knobby tuber is actually related to the sunflower, and its flavor is often described as nutty and slightly sweet.

  A Gardener’s Dream

If you’re looking for a low-maintenance crop, Jerusalem artichokes are a fantastic choice. Here’s why:

*Easy to Grow:** Just plant a few tubers in the spring, and they’ll happily multiply and spread.
* Hardy:** They can tolerate a wide range of soil conditions and even survive frost.
* Tall and Attractive: Their tall, sunflower-like stalks add a beautiful touch to any garden.
*Perennial:** Once planted, they’ll keep coming back year after year.

*A word of caution:** Jerusalem artichokes can be quite prolific, so be sure to give them plenty of space!

  Nutritional Powerhouse

Don’t let their unassuming appearance fool you – Jerusalem artichokes are packed with nutrients:

*High in Inulin:** A type of prebiotic fiber that’s great for gut health.
*Rich in Iron:** Essential for energy and oxygen transport.
*Good Source of Potassium:** Helps regulate blood pressure.
*Low in Calories:** A healthy addition to any diet.

   From Garden to Table: Culinary Uses

The versatility of Jerusalem artichokes in the kitchen is truly remarkable:

*Roasted: Roasting brings out their natural sweetness and nutty flavor.
* Mashed: They make a delicious and creamy alternative to mashed potatoes.
*Soups and Stews: Add a unique depth of flavor to your favorite winter warmers.
*Salads: Thinly sliced or grated, they add a crunchy texture and subtle sweetness to salads.
*Pickled:  A tangy and flavorful way to preserve them.

So, whether you’re a seasoned gardener or a culinary adventurer, Jerusalem artichokes are definitely worth exploring. They’re easy to grow, packed with nutrients, and incredibly versatile in the kitchen. Give them a try – you might just discover your new favorite vegetable!

First wash.

  Last week, I promised myself and the boys that by today, I would, in fact, wash a load of clothes using solar. It seems the electric company want to charge me a demand use charge every time I do laundry or use anything that pulls a fair amount of electricity.

  I’m over it, I’m moving full steam ahead, I’ll keep the power turned on but I will continue making it so we don’t need it. All they will get is the $20 or whatever the fee is for allowing them to have poles and meters in my yard.

  One doesn’t even run to our house, and I have no idea when they set the second pole. I wasn’t home when they did it.

  I had intended to buy a deep cycle battery or two today while I was out shopping. However, they were being, well boys.

  I took too long for thier short attention spans, I of course look at multiple things because I have so many projects going at any given time.

  If I went by myself I could definitely get more done, but they are young and it’s not like I’m just driving across town, which here I’m convinced you can get anywhere in town leaving from any point in town and arrive in five minutes or so.

  Where we go is an hour one way in either direction so I make the best of it.

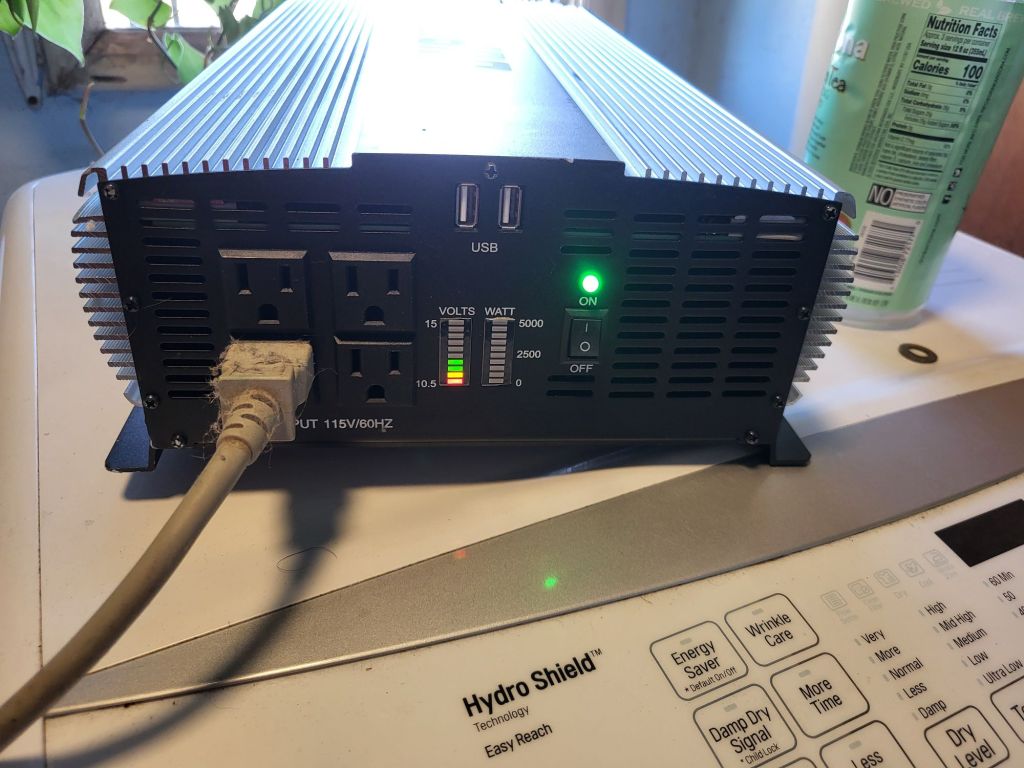
5k Jupiter inverter.
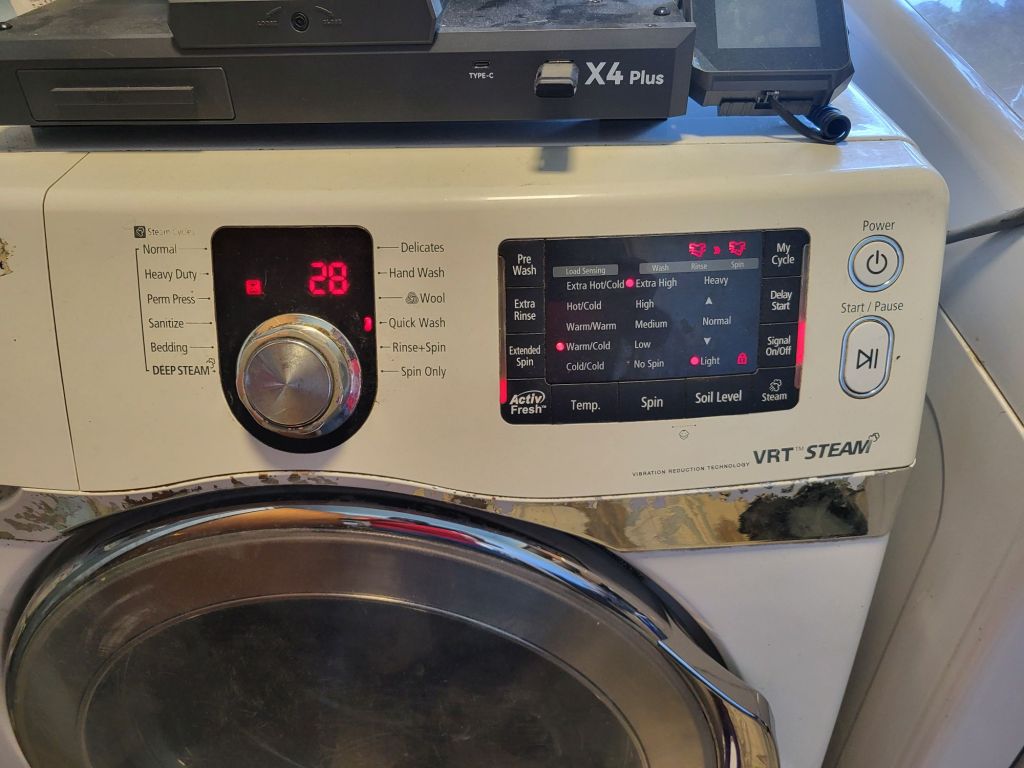
Almost halfway through the first load.

This is running on one 100-watt solar panel and a truck battery of unknown age and condition.  I generally use this battery to run the 12 volt grill. Which allows us to cook a meal for the price of a handful of pellets.

The last bag was $17 for a 40-lb bag.

  While my set up for this is sketchy at best, it is working and I can see where I need to improve to make this a regular thing.

  As it sits now, there is one 100-watt panel, one 100amp mppt charge controller, a Jupiter 5K 12 volt inverter, and a pair of 4agw 20-foot Viking jumper cables.

  Running full capacity, it calls for 2agw wires not more than 3 foot long. So I’m really pushing my luck here, though I’m only pulling around half or a little less of the rated power.. Nothing is getting warm. The cooling fans haven’t even kicked on yet and may not. The unit is cool to the touch.

  At first, I tried with just the battery, but it shut down on the first spin, so that was when I added the panel.

  While I would discourage anyone from trying the things I attempt and will tell you this as everything else I do and / or share are strictly for entertainment purposes only. I’m far from being an expert and am learning as I go, I have plenty of power to electrocute myself and burn our house down.

  I’m just doing a little at a time and figuring things out as I go. The soon to be 12 volt swamp cooler is my next big undertaking, or at least that is my plan.

  Once I figure out the pully, I can start putting it together.

  As always, thank you for reading my blog, I appreciate you.

Time to unwind a bit.

  TGIF.

  I don’t know about anyone else but it’s been a loooong week. I figured I’d have a drink and relax while enjoying some rare quite time. The boys generally are anything but quite.

  I seldom imbibe, but tonight is going to be different. I have my sphere ice cube in the newish and only bourbon glass I own.

  Found it thrifting and picked it up 25¢. In any event, I slowly poured my drink of choice over the ice.

  I could hear the ice crack and I thought I’m going to enjoy this, maybe even have a second glass.

  I got myself ready for bed. For months, I’ve had plans running through my head of the things I want to do or at least attempt to do.

  Of these things, I need to set up my CNC router, it’s likely underpowered for some of the things I want to attempt but it’s a starting point and I can upgrade if I need to. I also have a blast furnace I need to set up as well. ( I have a homemade one I made from the brake drum from a Kenworth, but want better. ) I will use it to make aluminum blocks that will eventually be turned into molds.

  These molds will then be used with the plastic injection molding machine that I am in the process of dreaming into life.

  I have the PID and ordered band heaters I just need to find and fabricate a few parts and I will be on my way. Finding plastic is no problem, in fact plastic itself seems to be a problem of sorts. Finding things to make from it that will be useful may help at least a little.

  I have delusions of grandeur, any thing I can come up with will be a drop in the bucket at best. But if enough dreamers come up with solutions, perhaps it will help.

  I also have a micro mill in the works. To say I stay busy is an understatement of biblical proportions..lol

  Raising young boys is more than enough to keep me hopping to be sure. On top of that, I of course have this blog, writing means a great deal to me. I’m working on a children’s book that the youngest and I drempt up one afternoon a few years ago.

  I’m also a content creator and post on YouTube and Tictok, though I’m thinking the latter is a waste of time where monetization is concerned.

  Tomorrow brings new challenges, I will be attempting to run the clothes washer on solar for the first time. My inverter was bought on a whim before having done any real research into the matter, but come on, it was on sale at a steep discount. How could I pass it up? Ugh

  Anyway, it’ll be a learning experience. And I will, of course, be including the boys. Maybe if they learn from my trial and error, they can make fewer mistakes?

  Which brings me back to where I started. While I could ramble on forever, I’ll spare you.

  The drink I poured is cloudy and has something floating in that I won’t be drinking. It seems my ice may have been handled by one of the boys, perhaps dropped on the floor and stuffed back in the zip lock bag with the rest? I don’t know what happened, and it doesn’t matter, to be honest. I won’t be having a drink after all. Seems doing a little writing put my mind at ease, and that was, after all, what I started out intending to do.

  All I know is I made it through another day, and now it’s bedtime. If you made it this far, thank you for reading and following along. Have a great night.


Grow ginger at home.

Let’s get down to the root of the matter! Growing ginger can be a rewarding experience, adding a fresh, zesty flavor to your cooking straight from your own garden (or even indoors!).

  Spice Up Your Life: A Guide to Growing Ginger at home.

One of the two rhizomes I’m planting this year.

  For what it’s worth I had been ill and it was suggested to me to make a ginger tea. I picked out two decent rhizomes. I ended up going to bed shortly after getting home with them and promptly forgot about them. They’d slipped behind our instant.

  It was probably two weeks later that I stumbled across them again, I was almost afraid to look, I just knew they had spoiled and would be headed to the compost pile.

  Much to my surprise and delight, they had sprouted and looked really healthy. I broke off several of the shoots thing I’d end up with a lot of ginger. However, none of them survived. So I’ve planted the entire thing.

  Ginger – that knobby, fragrant rhizome that adds a zing to everything from stir-fries to soothing teas.

  Did you know you can actually grow your own ginger, even if you don’t live in a tropical climate?

  While it thrives in warmth and humidity, with a little care and the right techniques, you can cultivate this flavorful spice right in your own yard.

  Imagine the satisfaction of harvesting your own fresh ginger, bursting with flavor and aroma, just steps from your kitchen.

  Whether you have a garden or a sunny windowsill, growing ginger can be a fun and rewarding horticultural adventure.”)

  Choosing Your Ginger: Start with the right root.
 

  The journey begins with selecting a healthy ginger rhizome to plant. Here’s what to look for:

* Organic is Best: Opt for organic ginger from a grocery store or purchase seed ginger from a reputable nursery. Non-organic ginger might have been treated with growth inhibitors.
* Look for “Eyes”: Choose a rhizome that has visible growth buds, also known as “eyes.” These are small bumps that look like they might sprout.
* Healthy and Firm: The rhizome should be firm to the touch, not soft, shriveled, or moldy.
(Tip for local conditions: “Given our Kansas climate, starting ginger indoors is highly recommended, especially to give it a good head start before the warmer months arrive.”)
Planting Your Ginger: Patience is a Virtue
Once you have your healthy ginger rhizome, it’s time to get planting:
* Prepare the Rhizome: You can plant the whole rhizome or cut it into pieces, ensuring each piece has at least one or two “eyes.” Allow the cut pieces to air dry for a day or two to help prevent rot.
* Choose Your Container (Indoors) or Location (Outdoors):
   * Indoors: Select a pot that is at least 12 inches deep and wide, as ginger roots spread horizontally. Make sure it has good drainage.
   * Outdoors: Choose a spot that receives partial shade, especially during the hottest part of the day. The soil should be rich, well-draining, and slightly acidic.
* Planting: Place the ginger piece(s) about 2-4 inches deep with the “eyes” facing upwards.
* Watering: Water gently but thoroughly after planting. Keep the soil consistently moist but not waterlogged.
* Warmth and Humidity: Ginger thrives in warm temperatures (ideally between 70-85°F or 21-29°C) and high humidity. Indoors, you might need to mist your plant occasionally, especially during dry periods. Outdoors, choose a sheltered location.
(Consider local timing: “In Syracuse, start your ginger indoors in late winter or early spring (February-March) to give it ample time to grow before the cooler fall temperatures arrive.”)
Nurturing Your Ginger: A Little TLC Goes a Long Way
As your ginger grows, here’s how to keep it happy:
* Watering: Continue to water regularly, keeping the soil consistently moist. Reduce watering slightly in the fall as the plant’s growth slows down.
* Fertilizing: You can feed your ginger plant with a balanced organic fertilizer every 4-6 weeks during the growing season.
* Pest and Disease Control: Ginger is relatively pest and disease-resistant. However, keep an eye out for common indoor plant pests like spider mites or aphids and address them promptly if they appear.
* Patience! Ginger takes time to mature. You’ll likely see shoots emerge within a few weeks, but it can take several months for the rhizomes to develop significantly.
(Outdoor considerations for Kansas: “If you move your potted ginger outdoors for the summer, choose a spot with protection from strong winds and direct afternoon sun. Be prepared to bring it back indoors once nighttime temperatures start to consistently drop below 50°F (10°C).”)
Harvesting Your Spicy Reward: The Sweet Smell of Success
You can start harvesting small pieces of ginger about 8-10 months after planting.
* Gentle Digging: Carefully dig around the edges of your plant to unearth some of the rhizomes. You can break off a piece and leave the rest of the plant to continue growing.
* Full Harvest: For a larger harvest, you can wait until the foliage starts to die back in the fall. Dig up the entire plant and harvest the rhizomes.
(Tip for continuous harvest: “If you’re growing ginger in containers indoors, you can often harvest small pieces from the side as needed, allowing the plant to continue producing.”)

  Beyond the Root: Enjoying Your Homegrown Ginger
Freshly harvested ginger has a more intense and vibrant flavor than store-bought.

  Use it in your favorite recipes, brew a warming ginger tea, or even try pickling it. The possibilities are endless!

  Growing your own ginger is a testament to the fact that you don’t need a tropical paradise to cultivate exotic flavors.

  With a little care and attention, you can bring the warmth and spice of homegrown ginger right to your kitchen.

  Have you ever tried growing ginger? Share your tips and experiences in the comments below!
When the Sky Turns Angry


  What to Do When a Tornado is Expected

Quail TX, 16 May 1977, F3

  Living in Kansas, we’re no strangers to dramatic weather. While the beauty of a prairie thunderstorm can be captivating, the threat of tornadoes demands respect and preparedness. However, as has been seen over the last few years, a tornado can strike anywhere.

  Knowing what to do when a tornado is expected can make all the difference in protecting yourself and your loved ones.

  Time is precious when a tornado warning is issued. Having a plan in place and knowing what actions to take can significantly increase your safety.

  Let’s review the crucial steps to take when a tornado is expected in your area.

  Understanding the Alerts: Watch vs. Warning

  First, it’s important to understand the difference between a tornado watch and a tornado warning:

* Tornado Watch: This means that conditions are favorable for tornadoes to develop in your area. It’s like a weather “heads-up.” During a watch, you should stay informed, monitor weather updates, and review your safety plan.
* Tornado Warning: This means a tornado has been sighted or indicated by weather radar and poses an imminent threat to the warned area. This is when immediate action is required.
(Clear call to action: “When a tornado warning is issued for your area, don’t delay – act immediately!”)
What to Do When a Tornado Watch is Issued:
* Stay Informed: Monitor local news channels, radio, weather apps, and official social media accounts for the latest updates.
* Review Your Safety Plan: Remind yourself and your family of your designated safe place and the route to get there.
* Check Your Supplies: Ensure your emergency kit is stocked with essentials like a flashlight, batteries, a first-aid kit, water, non-perishable food, a whistle, and a NOAA weather radio.
* Secure Outdoor Items: Bring in loose outdoor items like lawn furniture, toys, and decorations that could become projectiles in high winds.
* Be Aware of Changing Weather Conditions: Watch for signs of severe weather, such as dark or greenish skies, large hail, a loud roar like a freight train, and rotating clouds.
What to Do When a Tornado Warning is Issued:
Your immediate goal is to get to the safest possible shelter.
* Go to Your Predetermined Safe Place:
   * Basement or Storm Cellar: These offer the best protection. Get underground and away from windows.
   * Interior Room on the Lowest Floor: If you don’t have a basement, go to an interior room on the lowest floor of your home, away from windows, exterior walls, and doors. A small room like a bathroom, closet, or hallway is best.
   * Community Shelter: If your community has designated storm shelters, know their locations and have a plan to get there quickly.
* Protect Yourself:
   * Get Low: Crouch down on your knees and protect your head and neck with your arms.
   * Cover Yourself: If possible, get under a sturdy piece of furniture like a table or desk.
   * Stay Away From Windows: Flying debris from shattered windows can cause serious injury.
* If You Are in a Vehicle or Outdoors:
   * Never Try to Outrun a Tornado in a Vehicle: Tornadoes can change direction quickly and are often faster than cars.
   * Seek the Lowest Spot: If no sturdy building is nearby, lie flat in a ditch or other low-lying area and cover your head and neck with your arms. Be aware of potential flooding.
* If You Are in a Mobile Home:
   * Mobile Homes Offer Little Protection: Evacuate immediately and go to a designated storm shelter or the sturdiest nearby building.
* After the Tornado Passes:
   * Stay Informed: Continue to monitor weather updates and official information.
   * Be Aware of Hazards: Watch out for downed power lines, debris, and damaged buildings.
   * Do Not Enter Damaged Buildings: They may be unstable.
   * Help Others if You Can: Check on your neighbors and offer assistance if it’s safe to do so.

  Tornadoes are powerful forces of nature, but being prepared and knowing what to do can significantly improve your chances of staying safe. Take the time to create a plan, practice it with your family, and stay informed. It’s a small investment that can yield invaluable peace of mind.


  For more information on tornado safety, you can visit your County Emergency Management website or contact their office directly.

Mower Maintenance.

  Keep Your Yard Looking Sharp:

  Essential Routine Lawn Mower Maintenance:

A well kept lawn.

  Want a lawn that makes the neighbors green with envy (the good kind!)? A big part of achieving that lush, evenly cut look is having a lawnmower that’s running smoothly.

  Just like your car, your lawnmower needs a little TLC to perform its best and last for years to come. The good news? Most routine maintenance is something the average homeowner can easily tackle.

  Investing a little time in regular maintenance will not only keep your lawn looking fantastic but can also prevent costly repairs down the line and extend the life of your mower.

  While a lawn may not be necessary for many who homestead, if you do have one, keeping it neat not only gives you a place to ground, touch grass, let the kids play, etc… it also helps keep snakes and other unwanted visitors at bay. That being said:

  Let’s dive into some essential tasks you can do to keep your machine humming.”)
The Regular Checklist for a Happy Mower (and a Happy You!)
These are some key things you should check and maintain regularly throughout the mowing season:
* Keep it Clean: After each use, take a few minutes to brush off any grass clippings and debris from the top and underside of the mower deck. Built-up grass can trap moisture, leading to rust and affecting the mower’s cutting performance. A stiff brush or even a putty knife can work wonders. A hose and sprayer works well also and some mower come with a place to hook your water hose up to. They work well.
* Check the Blade: Before each use, take a quick look at the mower blade. Is it visibly damaged, bent, or excessively dull? A sharp, balanced blade is crucial for a clean, even cut. Dull blades tear the grass, making it look ragged and stressing the plant.
* Maintain Proper Oil Level: Just like your car, your lawnmower needs the right amount of clean oil to lubricate its engine. Before each use (or as recommended in your owner’s manual), check the oil level using the dipstick. Add the recommended type of oil if it’s low.
* Inspect the Air Filter: A clean air filter allows the engine to breathe properly. A clogged filter reduces performance and can even damage the engine over time. Check your air filter regularly (every 25 hours of use or once a season, depending on conditions) and clean or replace it as needed. Paper filters can often be tapped gently to remove loose dirt, while foam filters can sometimes be washed.
* Check the Spark Plug: The spark plug ignites the fuel in the engine. A dirty or faulty spark plug can cause starting problems or rough running.

  Inspect the spark plug periodically and clean or replace it according to your owner’s manual’s recommendations.

  Getting Down and Dirty: How to Change Your Lawn Mower Oil
Changing the oil is a bit more involved but still manageable for most homeowners. Here’s a general guide (always consult your owner’s manual for specific instructions for your model) Youtube will more than likely have a video on your mower so if you don’t have an owner’s manual check there, and if not the closest library or Google search should help.

* Gather Your Supplies: You’ll need the correct type and amount of new oil (check your manual!), an oil drain pan, a wrench or socket to remove the drain plug (if your mower has one), and rags or paper towels to clean up any spills. You might also need a funnel to pour in the new oil.
* Warm Up the Engine (Optional but Recommended): Running the mower for a few minutes beforehand can help warm up the oil, making it flow more easily. Make sure the engine is OFF and the spark plug wire is disconnected before proceeding with the oil change.
* Locate the Drain Plug or Drain Spout: Your mower will either have a drain plug on the bottom or side of the engine or a drain spout with a cap. On some you will have to pull the dipstick out and either pump it out with a small trasfer pump or turn the mower upside down over a drain pan. Consult your owner’s manual if you’re unsure.
* Position the Drain Pan: Place the drain pan directly beneath the drain plug or spout.
* Remove the Drain Plug or Open the Drain Spout: Use the appropriate wrench or socket to carefully remove the drain plug. If you have a drain spout, remove the cap and direct the flow into the pan.
* Allow the Old Oil to Drain Completely: Let the old oil drain fully into the pan. This might take several minutes.
* Reinstall the Drain Plug or Close the Drain Spout: Once the oil has drained, replace the drain plug and tighten it securely (but don’t overtighten). If you have a drain spout, close the cap tightly.
* Locate the Oil Fill Cap: This is usually on the top or side of the engine and is often marked with an oil can symbol.
* Add New Oil: Remove the fill cap and carefully pour in the new oil using a funnel, making sure to use the correct type and amount as specified in your owner’s manual. Don’t overfill!
* Check the Oil Level: Replace the fill cap and then check the oil level using the dipstick. Add more oil if needed to reach the correct level.
* Dispose of Old Oil Properly: Take your used motor oil to a designated recycling center or auto parts store for proper disposal. Do not pour it down the drain or throw it in the trash.
(Short paragraph reinforcing the benefits: “Taking these routine steps, especially changing the oil, will keep your lawnmower running efficiently, prevent engine wear, and help you achieve a nice looking lawn.

  A Little Effort Goes a Long Way
Maintaining your lawnmower might seem like another chore, but the benefits are well worth the effort. A well-maintained mower will cut cleaner, last longer, and make your lawn care tasks much more enjoyable (or at least less frustrating!). So, take a little time to show your mower some love, and it will reward you with a yard that looks its absolute best.

  What are your go-to lawnmower maintenance tips? Feel free to share them in the comments below!