HHO generator

  I’m working on an HHO generator.

  My design is pretty simple, I 3D printed the spacers and support brackets.
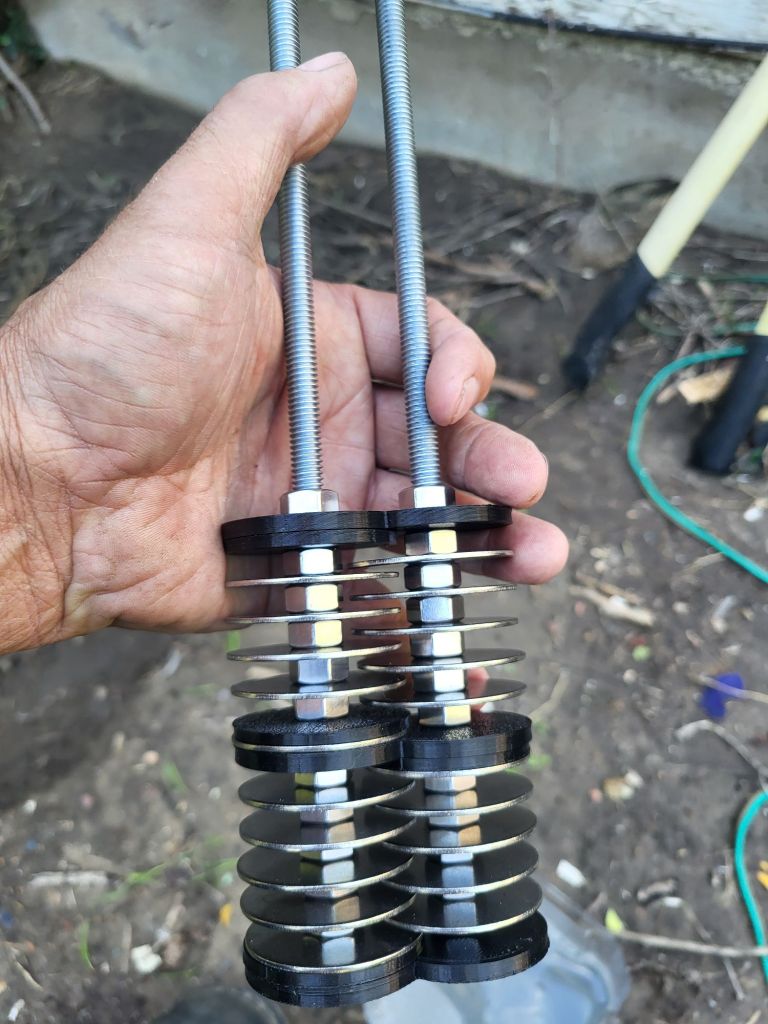
It works.

  When I hooked it to the solar panels, it did nothing, then slowly it started to bubble and then it made a lot of bubbles.

   I hope to use this as a torch and hopefully other uses. We will see what comes of it.

  Below are some thoughts on the subject.

  Harnessing Oxyhydrogen:

  A Practical Guide to Small-Scale HHO Generators.

  Water is made of two hydrogen atoms and one oxygen atom (H_2O). But when you pass a direct electric current through it, a fascinating transformation occurs: the chemical bonds break, releasing hydrogen and oxygen in a volatile, highly combustible gas mixture known as HHO (or Brown’s Gas).

  While massive hydrogen fuel cells dominate headlines, small-scale HHO generators have quietly carved out a niche among DIY hobbyists, mechanics, and off-grid tinkerers.

  How an HHO Generator Works
At its core, an HHO generator is an electrolyzer. The setup requires a few basic components:

  Electrolyte Solution: Pure water is actually a poor conductor of electricity, so a small amount of an electrolyte—typically potassium hydroxide (\text{KOH}) or baking soda—is added to facilitate the flow of current.

  Stainless Steel Plates: Arranged in alternating positive and negative charges (a “dry cell” or “wet cell” configuration) submerged in or fed by the water mixture.
DC Power Source: A battery, power supply, or solar panel drives the reaction.

  When power is applied, bubbles immediately form on the plates. Hydrogen gas collects at the cathode, and oxygen gas forms at the anode. Instead of separating them, an HHO generator pipes them together into a single outlet hose as a 2:1 mixture of hydrogen to oxygen.

  Practical Small-Scale Uses for HHO
Because HHO burns exceptionally hot (up to 2,800°C or 5,072°F) and burns back into pure water vapor, it offers several intriguing benchtop and workshop applications:


1. Precision Micro-Torch for Jewelry & Glasswork
One of the most practical DIY uses for a small HHO generator is converting it into a micro-torch.
Why it works: The flame from an HHO torch is extremely thin, clean, and intense.
Applications: Ideal for soldering silver, gold, or copper wire, as well as working with small-scale glassblowing (flameworking) or melting small quantities of precious metals without leaving carbon residue on the workpiece.


2. Carbon Cleaning for Small Engines
HHO gas is widely used in automotive engine carbon-cleaning machines, and small hobbyist setups can do the same for lawnmowers, motorcycles, or generator engines.
Why it works: Feeding a controlled amount of HHO into a running engine’s air intake elevates combustion temperatures slightly and introduces reactive hydroxyl radicals, which break down stubborn carbon deposits on valves, spark plugs, and cylinder walls.


3. Benchtop Metallurgy & Brazing
When working with metals like copper pipes or small steel joints, an HHO torch acts as a portable, cylinder-free brazing rig. Unlike traditional acetylene setups, an HHO generator makes gas on demand, meaning you don’t need to store pressurized tanks of volatile gas in your garage.


4. Educational & Off-Grid Demonstrations
Small HHO generators make excellent educational models for demonstrating electrolysis, renewable energy storage (e.g., using excess solar energy to split water), and combustion thermodynamics.

  The Reality Check: Myths vs. Science
If you search for HHO generators online, you will inevitably run into claims that they can make cars run purely on water or double fuel economy.

  It’s important to separate hype from physics:
The Energy Balance (Thermodynamics): Splitting water requires more electrical energy than you get back when burning the resulting HHO gas. You cannot achieve a net energy gain (overunity) using HHO.

  Fuel Assistance: In small engine combustion, HHO is used as a combustion enhancer rather than a primary fuel source. Because hydrogen ignites much faster than gasoline or diesel, adding tiny amounts can help burn fuel more completely, which may slightly reduce unburnt carbon emissions under specific conditions—though driving an engine’s alternator to produce that HHO incurs an energy penalty.


  Essential Safety Precautions
Working with HHO means handling stoichiometric hydrogen and oxygen—an inherently explosive mix that doesn’t need external air to ignite.

  If you build or operate a generator, keep these non-negotiables in mind:
Always Use a Bubbler / Flashback Arrestor: A bubbler (a water-filled container the gas passes through) acts as a physical barrier. If a flame travels back down the hose, the explosion stops at the bubbler rather than detonating your main cell.
Never Store HHO Gas: Produce it on demand and burn it immediately. Storing stoichiometric HHO in a sealed pressure vessel is extremely dangerous.

  Proper Ventilation: Hydrogen is light and diffuses rapidly, but trapped hydrogen in an enclosed space creates an explosion hazard. Always work in a well-ventilated area.

  Getting Started
If you’re interested in experimenting, starting small is key. Building a simple 12V dry-cell kit or buying an inexpensive benchtop HHO jewelry torch allows you to explore the fascinating chemistry of water electrolysis safely without spending a fortune.
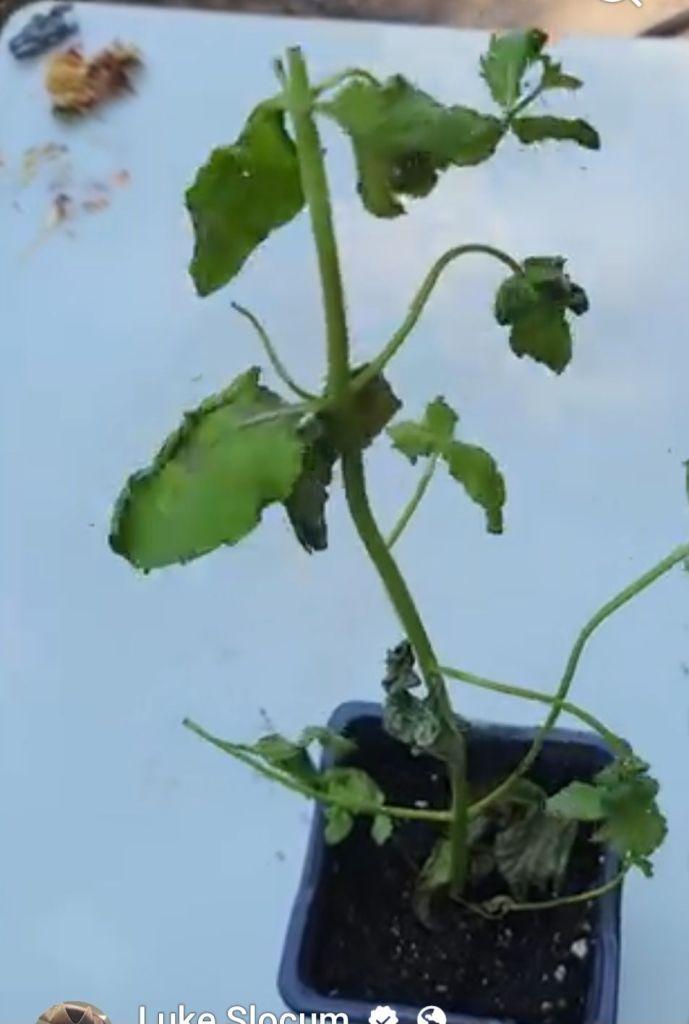
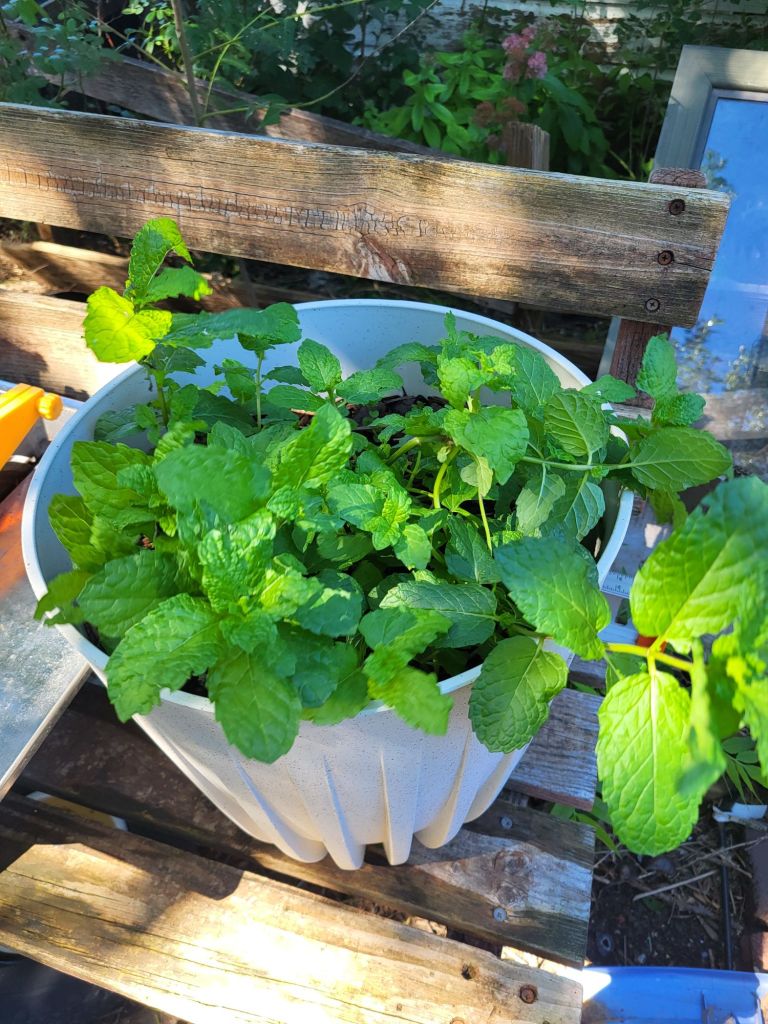
Sickly Mint plant.

  A while back I was in Walmart and as I walked a stand that has mints and some other herbs I saw one surviving mint.

  The rest of the plants were dried out and brittle, I imagine instead of trying to revive them they just tossed them in the trash.

  I decided to see if I could save this one but was doubtful I could.

I took a screen shot of my facebook video, seems I didn’t take a photo of this plant.

  Anyway, above is what it looked like then. It suffered and lingered for a couple of weeks, but it started putting on new leaves.

  Then it started to have lower branches set roots, and now I can easily see why I was told to not plant it in the yard.

  This this in a beast, it’s totally filled the oversized pot I put it in.

Today it looks like this.

  On the backside where you can not see there was a random stem that shot up from the roots on a stem that I’d stick in the soil to see if it would root.

  It did, in multiple spots, and the stem that shot up? Well it laid itself on top of the soil and set roots in about six places making six more plants.

  I am so glad that I listened and didn’t put it in the flower bed like I was considering at the time.

  If you’d like feel free to share your thoughts and experiences with mint, I’d love to hear it and someone else may benifit from your knowledge!

  Thank you for taking time out of your day to read this post!

I’ve been on a bit of a hiatus.

At times life just gets a little too real and one needs a break.

  Too be honest, this domain and hosting lapsed, I was going to just let it go, but as the days went by I decided I couldn’t just let it go.

  This blog has few followers and has never earned a cent in the six years since I created it. And to be honest I am okay with that, it helped me find my voice and confirmed my love of writing, some may call it bloviating. 

   Be that as it may I have things to say and things to share. If you’ve read this far I’d appreciate if you would like, subscribe and share my content.

  I’m working on monitizing social media and have actually succeeded in getting into the creators rewards program on Tictok. I haven’t made any money as of yet there either. But I am getting offers of free samples to check out and offer for sale if I like them, so that’s a start.

  In any event, I am back with more to say and share with anyone who is interested. I find that while my main goal is homesteading there is so much more to life than just a common sense way of living and I will be trying to traslate the videos I post every where else into a blog format that makes sense.

  If anyone has ideas, hints or tips please feel free to weigh in, I’d love to hear from you!

When anger wins

I recently became overwhelmed and lashed out at someone I care a great deal about. It was in all reality a simple misunderstanding and had I stepped back before speaking I would have realized that, but here we are. All I can do is hope I can repair the damage I caused. I’m written this in hopes it may help someone else not make the same mistake I have.

Navigating Regret and Breaking the Cycle
We have all done it. We get pushed to a breaking point, the filter dissolves, and words spill out that are sharp, reactive, and ultimately, untrue. In a singular moment of unchecked frustration, we can damage the trust and love we have spent years building with someone we adore.
Today, I am writing from that place. I am filled with a deep sense of remorse. I said things I did not mean to someone I value greatly, and watching the impact of my words has been devastating.
It is easy to beat ourselves up, to drown in guilt, but guilt alone does not fix the damage or prevent the next outburst. If you find yourself in this same boat, navigating the storm of regret, here is how we can move from remorse to real, lasting repair.
The Immediate Aftermath: Owning It
The first step, and the hardest, is to stop making excuses.
Step 1: The Sincere Apology (No “Buts”)
A real apology does not include justifications like, “I’m sorry, but you made me angry.” A real apology is unconditional. It focuses entirely on your behavior and its impact on them.
What to say: “I was wrong to say those things. My anger does not excuse my behavior. I hurt you, and I am truly, deeply sorry for the pain I caused.”
Step 2: Offer a Reparation (The Action)
An apology without action is often hollow. Repairing the relationship requires a commitment to doing things differently. This is where you outline how you will change. This isn’t just about promises; it’s about a plan.
What to say: “I value our relationship too much to keep hurting you like this. I have a plan to manage my reactions, and I will be working very hard to ensure this never happens again. I would like to show you that, if you are willing to give me the chance.”
The Long Game: Preventing the Re-Run
Is it possible to ensure this never happens again? To be human is to feel anger. We cannot eliminate the emotion, but we absolutely can change how we respond to it. This is not about self-suppression; it’s about self-mastery.
Here are the concrete tools I am implementing right now to break this cycle:
1. Know Your “Tells” (The Warning Signs)
Anger is physical before it is verbal. Pay close attention to your body.
Are your shoulders tensing?
Is your heart rate increasing?
Is your stomach in knots?
Are you clenching your jaw?
These physical cues are your early-warning radar. If you can catch the anger here, you can intervene before it takes over your voice.
2. The Power of the Physical Pause
The moment you feel those warning signs, you must invoke a mandatory pause.
The Rule: If your internal temperature is rising, the conversation stops. Immediately.
What to say: “I am starting to get too upset to talk about this productively. I need ten minutes to cool down, and then we can finish this.” (Make sure to specify that you will return to the conversation, so it doesn’t feel like abandonment.)
3. Leave the Room (Seriously)
Sometimes you need a physical reset to get an emotional one. When you feel the anger building, physically remove yourself from the trigger. Go into another room, step outside for fresh air, or even just wash your face with cold water. This physical change can help interrupt the escalating loop of angry thoughts.
4. Breathe. No, Really Breathe.
When we get angry, our breath becomes shallow and rapid, which triggers our “fight or flight” response. You need to manually switch your body back into the “rest and digest” state. Try the “Square Breathing” technique:
Inhale for 4 seconds.
Hold for 4 seconds.
Exhale for 4 seconds.
Hold empty for 4 seconds.
Repeat this cycle three or four times. This is biological proof to your nervous system that you are safe.
5. Reflect, Don’t Replay
When you are in your cool-down period, don’t just replay the argument and all the reasons “why you are right.” That will only fuel your anger. Instead, reflect on your goals:
What do I actually want the outcome to be?
Does attacking this person help us reach that goal? (The answer is always no).
How will I feel about this conversation ten minutes from now? Tomorrow?
6. Consider Professional Support
If you feel your anger is reactive and uncontrollable on a regular basis, this may be a sign of underlying issues that are hard to unpack alone. Seeking a therapist or coach to help you identify triggers, manage stress, and learn new communication tools is a sign of strength, not weakness. It is an investment in your well-being and in the relationships you care about.
Moving Forward
Regret is a difficult emotion, but it is also a powerful catalyst for change. It reminds us of what we value and where we need to grow. While I cannot take back the words I said, I can dedicate myself to the actions that ensure they are the last words of their kind that I will ever speak.
We are all works in progress. Healing a relationship takes time, and you must respect the other person’s need for space. While you wait for that healing to unfold, focus entirely on the work within yourself. The best apology you can ever offer is a changed future.

Unsung Heroes.

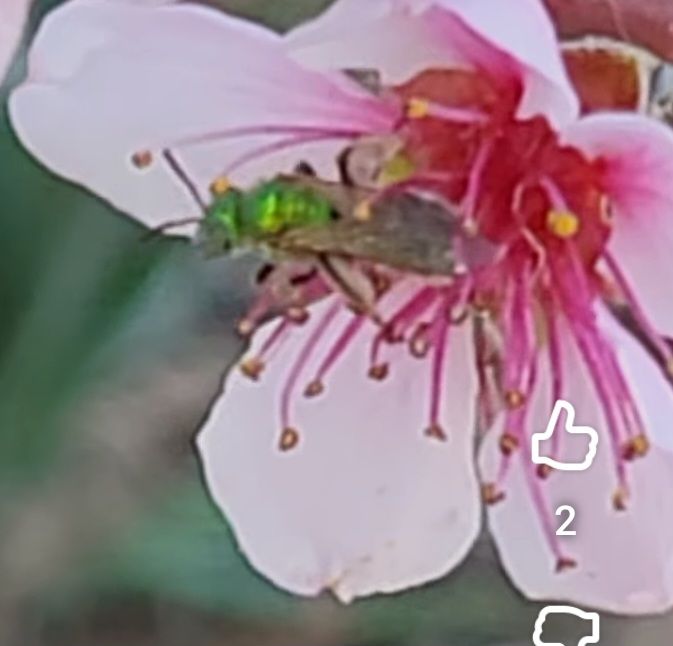
Golden green sweat bee on the nectarine tree.

Why Golden Green Sweat Bees Matter
When people think of bees, the classic fuzzy honeybee usually steals the spotlight. But if you look closely at your flowers on a sunny day, you might spot a flash of metallic emerald zipping through the air. These are Golden Green Sweat Bees (from the family Halictidae), and they are some of the most efficient and beautiful pollinators on the planet.
Nature’s Living Jewels
These bees aren’t just pretty faces. Their vibrant, metallic sheen serves as a reminder of the incredible diversity within our ecosystems. Unlike honeybees, many species of green sweat bees are solitary, meaning they don’t live in large hives. Each female is a hard-working entrepreneur, building her own nest and providing for her offspring entirely on her own.
Heavy Lifters in the Garden
Don’t let their small size fool you. Golden green sweat bees are “generalist” pollinators, meaning they visit a huge variety of flowers. They are particularly vital for:
Wildflowers: Maintaining the genetic diversity of our local prairies and meadows.
Urban Gardens: Thriving in backyard patches where larger bees might struggle.
Agriculture: Boosting yields for crops like sunflowers, stone fruits, and alfalfa.
The “Sweat” Misconception
Their name comes from their attraction to human perspiration. While it might be a bit startling to have a metallic bee land on your arm, they aren’t looking to sting. They are simply seeking the salts and minerals found in sweat to supplement their diet. If you stay still, they’ll usually finish their “snack” and fly right back to the flowers.
Why We Should Protect Them
Like many pollinators, these bees face threats from habitat loss and pesticide use. Because they often nest in the ground or in rotting wood, they are especially sensitive to heavy tilling and chemical treatments. By leaving a little “wild” space in our yards, we ensure these emerald beauties continue to keep our world blooming.

Creating a sanctuary for golden green sweat bees is actually much easier than building a traditional honeybee hive. Since many of these bees are ground-nesters or cavity-dwellers, the best thing you can do is often a little less yard work!
Here is how you can turn your outdoor space into a five-star resort for these metallic beauties:
How to Create a Sweat Bee Sanctuary
1. Leave Some Ground Bare
While thick, green lawns are popular, they are essentially a “keep out” sign for ground-nesting bees.
The Strategy: Find a sunny, well-drained spot in your garden and clear away the mulch or grass to expose the soil.
The Benefit: Female sweat bees will tunnel into this soft earth to create waterproof cells for their larvae.
2. Provide “Bee Hotels” and Deadwood
Not all sweat bees live in the dirt; some prefer pre-existing holes in wood or pithy stems.
The Strategy: Leave dead stalks from flowers like sunflowers or raspberries standing through the winter. You can also drill small holes (between 3mm and 10mm) into untreated scrap wood.
The Benefit: These provide ready-made “apartments” for species that prefer to nest above ground.
3. Plant a Color Palette
Sweat bees are generalists, but they are particularly fond of certain flower shapes and colors.
Favorite Flavors: Focus on the Asteraceae family, which includes daisies, coneflowers, black-eyed Susans, and asters.
Color Profile: They are highly attracted to yellow, purple, and white blooms.
Succession Planting: Ensure something is blooming from early spring through late fall so they always have a food source.
4. Ditch the Chemicals
Because many sweat bees live in the soil, they are hit doubly hard by garden chemicals.
The Strategy: Avoid using broad-spectrum insecticides and synthetic fertilizers.
The Benefit: This keeps the soil healthy for the bees and ensures the nectar they collect is “clean” for their young.
5. Offer a “Salt Station”
Since they love minerals, you can create a safe spot for them to hydrate.
The Strategy: Create a shallow mud puddle or place a damp sponge in a dish with a pinch of sea salt.
The Benefit: This gives them the nutrients they need without them having to land on your arm for your sweat!

Winner for biodegradable starter pots.

I’ve been experimenting with different medium for making biodegradable starter pots. The main ingredient has been paper generously donated to us in the form of junk mail and packaging from food stuff.

  This is my latest rendition of the concept which started with a desire to find a use for all that paper. While pots made from nothing but paper pulp do in fact work, I’ve found they can start to mold and fall apart before I’m ready to plant.

Paper pulp and adobe soil.

  The one pictured is made with paper pulp and adobe soil. At first I mistakenly planted this Jade Elephant garlic upside down and only figured it out when I dug it out to see if it had any roots. I corrected my mistake and hoped it would recover from the rot it had.

  This thing is growing like crazy, even sending roots out from the sides, normally roots coming out side of a pot would air prune and die off. I’m assuming it’s the combination of paper pulp, adobe and coconut coir that has enabled these roots to be so health.

  I know it’s normal to seperate all the individual cloves to get more and bigger bulbs. However for this one I’ve decided to let it grow like it would have it came up wild with no outside interference.

  I know wild grains are far more health than those heavily farmed, I’m attempting a return to nature, one small step at a time. If anyone else is attempting such a life style change please feel to weigh in. I’m currently just doing what seems natural to me and may be way off.

  On a side note, the male pattern baldness that set in in my mid to late 30’s is reversing and now all the places that had little to no hair are once again covered. I’ve noticed I’ve regained as much as someone I know in their 30’s who told me they were using “a product” to restore thiers.

  While not as thick as it once was it seems to filling in okay, I think this is from more onions and less processed foods in our diet. Anyway, I’m getting off topic and rambling and I apologize! Thank you hanging out long enough to read all this.

Growing bell peppers from store-bought peppers.

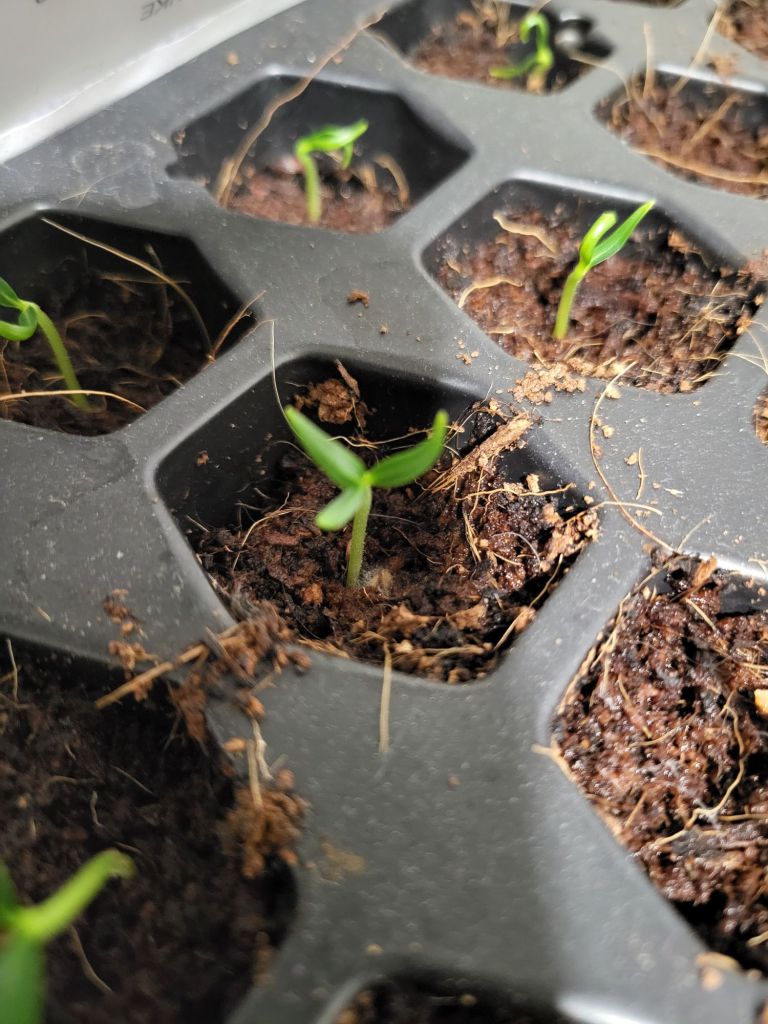
  We currently have 39 Bell Pepper sprouts with more to come.

  Below is a tricodileadian pepper sprout, rare, though not unheard of. This is my first in more than 50 years of growing plants.

Tricodileadian, my first ever.


From Kitchen to Garden: Growing Bell Peppers from Store-Bought peppers!

  Ever chopped open a beautiful bell pepper and noticed all those tiny seeds staring back at you?

  Instead of tossing them, imagine turning them into a thriving plant, bursting with fresh, vibrant peppers right in your own backyard (or balcony!).
 

  It might sound too good to be true, but with a little patience and a few simple steps, you absolutely can grow delicious bell peppers from the seeds of your favorite grocery store varieties.

  It’s a fantastic way to save money, reduce waste, and connect with your food source.

  Why Grow from Store-Bought?

  Cost-Effective: You’re literally using something you’d usually discard. Free seeds!

  Taste Test Approved: You already know you love the flavor of the pepper you’re planting.

  Beginner-Friendly: Bell peppers are relatively easy to grow, making them perfect for new gardeners.

  What You’ll Need:
A fresh bell pepper (any color!)
Small pots or seed-starting trays
Good quality potting mix

  A sunny windowsill or grow lights
Watering can or spray bottle.

Step 1: Harvesting and Preparing Your Seeds
Select Your Pepper: Choose a healthy, ripe bell pepper. Organic is often recommended as non-organic peppers might be hybrids with sterile seeds, or treated with chemicals that inhibit germination. However, many people have success with conventional peppers too, so don’t let it stop you!
Extract the Seeds: Carefully cut open your pepper and gently scrape out the seeds. Try to get as much of the fleshy pith off as possible.
Rinse and Dry: Rinse the seeds under cool water to remove any remaining pepper flesh. ( This is recommended,  though I never do it. ) This helps prevent mold. Spread them out on a paper towel or plate in a single layer and let them dry completely for several days. They should be brittle, not sticky.

Step 2: Planting Your Seeds
Prepare Your Pots: Fill your small pots or seed trays with moist potting mix. Leave about half an inch of space from the rim.
Sow the Seeds: Plant 2-3 seeds per pot, about 1/4 inch deep. Bell peppers have a decent germination rate, but planting a few increases your chances. Lightly cover with potting mix.
Water Gently: Mist the soil surface with water to ensure good seed-to-soil contact. Don’t drench it; just keep it consistently moist.
Step 3: Germination and Care
Warmth and Light: Bell pepper seeds love warmth. Place your pots in a warm spot, ideally around 70-80°F (21-27°C). A sunny windowsill is good, but if you have a heat mat, even better!
Be Patient: Germination can take anywhere from 7 to 21 days. Don’t lose hope! Keep the soil moist but not waterlogged.
Thinning: Once your seedlings emerge and have a couple sets of “true leaves” (the second set of leaves that look like tiny pepper leaves), thin them to the strongest seedling per pot. Snip the weaker ones at the soil line to avoid disturbing the roots of the strong one.

Step 4: Growing On
Once your seedlings are about 4-6 inches tall and the danger of frost has passed (if planting outdoors), they’ll be ready for their next adventure!
Transplanting: Move them to larger pots (5-gallon containers work well for one plant) or directly into your garden bed, ensuring they have plenty of space (about 18-24 inches apart).
Sunlight: Peppers need at least 6-8 hours of direct sunlight per day.
Watering: Keep the soil consistently moist, especially during flowering and fruiting.
Support: As they grow taller and start producing fruit, bell pepper plants can become top-heavy. Provide stakes or cages for support.

  The Rewards of Your Labor
There’s nothing quite like picking a juicy, crisp bell pepper that you grew yourself. It’s a testament to patience, nature, and the simple joy of nurturing life.

  Even if your first attempt isn’t perfect, every gardener has trials and errors. The important thing is to have fun with it!
Happy planting!

New beginnings!

  The boys and I are starting work on the other house.

  The other house is at least twice the size of the tiny house we are in now, the boys are old enough that they need thier own rooms.

  Where we are headed needs a lot of work and a great deal of cleaning, the house has sat vacant for around six years and had been being used for storage, so we have our work cut out for us.

  It could be made into a five bedroom house but we only need three, that will leave me with the basement to myself with room for a small home office.

  Brayzen and I cleaned the overgrown dead weeds from the front yard, we can sit on the old benches and use the firepit again.

  We’ve also cooked dinner there the last two days on an old Daniel Boone smoker I’d salvaged years earlier. Much to my surprise it turned on after just sitting uncovered out doors for all those years, most of the pellets were still good even.

  The auger was siezed in place from the pellets left in it turning into powder and becoming solid. Brayzen and I dug and scraped with a flat head screwdriver and eventually we got it freed up.

  The first night Brayzen stood on the front porch taking in the amount of work we’d done, he turns and looked at me and said ” you could make this into a paradise. “

  And I found myself in agreement,  it’s not the 160 acres I’d wanted so badly but it sits in three city lots, I will plant more fruit trees and put in raised garden beds.

  I’ll also be putting in a walipini and a good sized root celler. There will be many projects ahead, repairs to old shop equipment that has been in a state of disrepair and some reorganizing in the undersized garage to make a wood working shop.

  I’ll also finish enclosing the old car port and use that as a shop for welding and fabrication etc.

  While things haven’t been going exactly as planned and nearly having a mental breakdown from unexpected events making me question who I really am.

  Then I remembered I am who I’ve always been, a little beat up from the years and losses, but I’m still man my mom and dad raised me to be. It’s good to question if you’re on the right path and doing the right things from time to time. I think it’s normal.

  While I may not have it all figured out, I know for a fact things recently said to me do not ring true and made me realize it was things said to me that caused that doubt to creep in in the first place.

  If you’ve read this far, give a follow and watch us grow into more than we currently are.

When you mess up, own it.

It’s a universal, stomach-dropping moment: you realize a joke didn’t land, a comment was misconstrued, or you completely forgot an important detail about someone’s life, or worse still you don’tacknowledge someone in a way they felt was appropriate.

  Suddenly, you’re the “villain” in a story you didn’t even know was being written.

  The “Ouch” Moment: How to Recover When You Accidentally Slight Someone

  We’ve all been there. You’re mid-sentence, feeling witty and conversational, when you see it—the micro-expression. A flicker of hurt, a tightening of the jaw, or a sudden, icy silence.

  In your head, you were being playful. In reality, you just stepped on a conversational landmine. Whether it was a “joke” about a sensitive topic or accidentally leaving someone off an invite list, the accidental slight is one of the most uncomfortable social glitches we face.

1. Own the Awkwardness (Immediately)
The temptation is to ignore it and hope it goes away. Don’t. Silence usually feels like indifference to the person who was hurt. If you catch it in real-time, the “Instant Pivot” is your best friend.
What to say: “Wait, that came out completely wrong. I’m sorry, I didn’t mean for that to sound so dismissive.”
Why it works: It shows you’re self-aware enough to notice their reaction and care about their feelings.

2. Avoid the “If” Apology
The quickest way to turn a slight into a full-blown argument is the phrase: “I’m sorry if you felt that way.” This shifts the blame onto their “sensitivity” rather than your words. Instead, try: “I’m sorry that my comment was hurtful.” It’s a subtle shift, but it validates their experience without making it about your intent.

3. Intent vs. Impact
This is the hardest pill to swallow. You might have had the best intentions in the world, but impact trumps intent every time. > Pro-tip: You don’t get to decide how much your words hurt someone else. If they’re stung, they’re stung. Acknowledging the impact—even if you think they’re overreacting—is the fastest bridge back to a good relationship.

4. Resist the Over-Explanation
When we feel guilty, we tend to ramble. We explain the history of the joke, our mood that morning, and our general philosophy on life. Stop,  over-explaining, it often sounds like you’re making excuses.

  Keep it brief:
Acknowledge the mistake.
Apologize sincerely.

  Move on (unless they want to talk about it).

The Bottom Line:

  We are all clumsy humans navigating a complex web of triggers and perspectives. Accidentally hurting someone doesn’t make you a bad person—it makes you a person. The magic isn’t in being perfect; it’s in being brave enough to say, “I messed up, and I value you enough to fix it.”

Homemade flower pots

Rooting for the Planet: How to Make Your Own Biodegradable Flower Pots

  I’ve been experimenting with ways of making pots for starting plants in for awhile now.

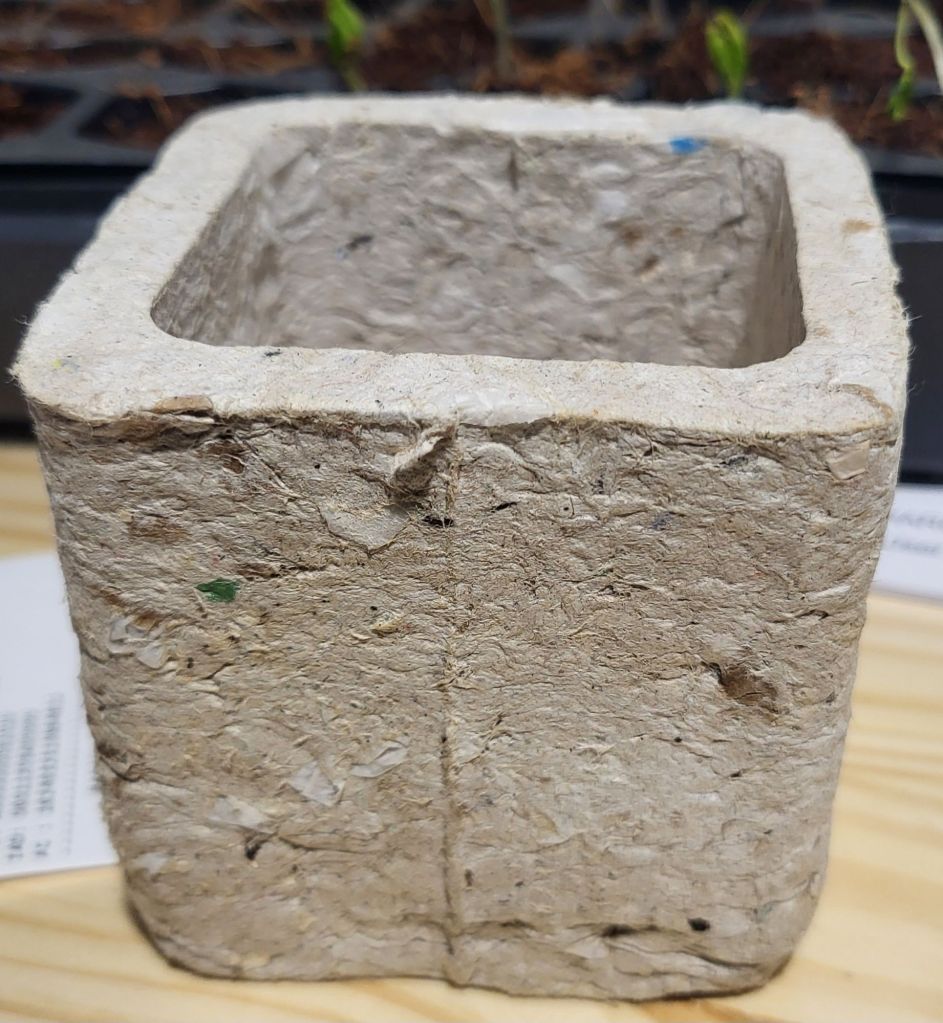
This is waste paper pulp pot.

  The one above is made from waste paper and is similar to one’s I’ve made in the past, except those were round. I have considered putting some sort of binder in the mix but haven’t done so yet. They seem to hold together well just from being tightly compacted in the mold.

  They also work well to cut down on houshold waste, which is something I’ve been working on for some time. Obviously we can’t cut out all waste, life is messy after all. But we can all do little things in our own ways and it will make a huge impact over time.

  Making things from paper pulp is a great way to make sure sensitive documents that need destroyed never fall into the wrong hands. Make a flower pot, bury it in the yard with a plant in it and nature will take care of it.

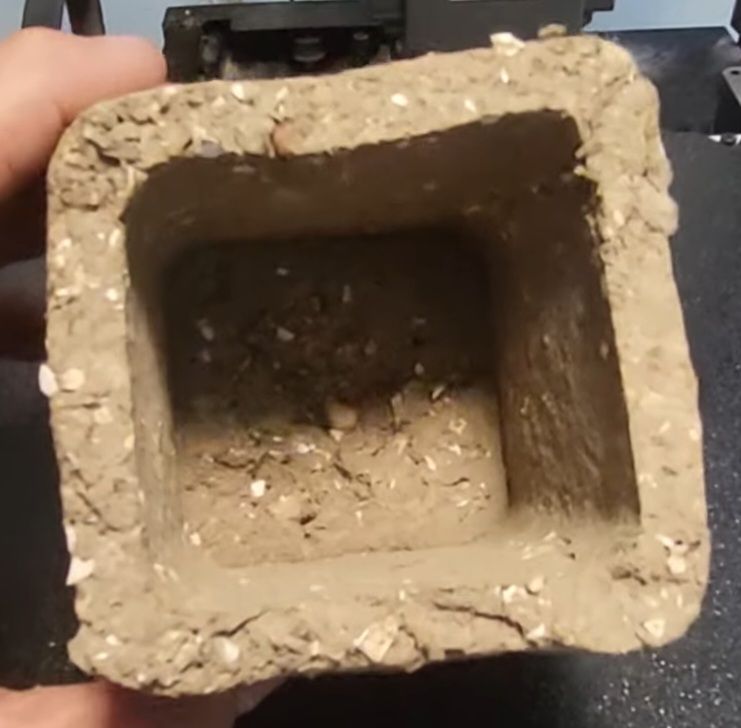
This one is paper pulp and adobe mud.

  My latest attempt consisted of paper pulp and some adobe mud I dug up out of the yard. It came out crude and wasn’t real easy to work with either. It is however solid and feels substantial in comparison to the paper pulp ones.

  I think if the soil was sifted and all the bigger particles were removed it would make a much better looking pot. This is a work in progress for me and I will share the results as I progress and learn!

  Below are some other methods you might like better, all in all it’s a great idea to recycle and can be fun when you involve your children.

  If you’ve ever felt a pang of guilt tossing those black plastic nursery pots into the bin, you aren’t alone.

  While they’re convenient, they aren’t always recyclable and can linger in landfills for centuries.

  The good news? You can create biodegradable starter pots using simple materials you likely already have in your kitchen or recycling bins.

  These pots are fantastic because they can be planted directly into the ground, reducing “transplant shock” by keeping the delicate root systems undisturbed.

  Why Go Biodegradable?

  Zero Waste: You’re upcycling household waste into something functional.

  Healthier Plants: Roots grow right through the walls of the pot, preventing them from becoming “root-bound.”

  Convenience: No more digging plants out of plastic; just drop the whole pot into a hole and cover with soil.

3 Easy Ways to Make DIY Eco-Pots

1. The Classic Newspaper Pot
Newspaper is a gardener’s best friend. It’s thin enough to decompose quickly but sturdy enough to hold soil for a few weeks.

  How to do it: Cut a strip of black-and-white newspaper (avoid the shiny, colored inserts). Wrap it around a small jar or a dedicated “pot maker” tool, fold the bottom edges inward to create a base, and slide the jar out.

Pro Tip: Use a double layer of paper if you’re growing larger seedlings like squash or cucumbers.

2. The Toilet Paper Roll Hack
This is perhaps the easiest method. Cardboard rolls are the perfect size for deep-rooted seedlings like beans or peas.

  How to do it: Make four 1-inch vertical cuts at one end of the roll. Fold the flaps inward, overlapping them like you’re closing a cardboard box.

Pro Tip: Keep these in a tight tray; since they are tall and narrow, they like to tip over if they aren’t snuggled together.

3. The Hollowed Eggshell
For tiny seeds like herbs or flowers, eggshells provide a nutrient-rich “cradle.”

  How to do it: Next time you make breakfast, try to crack just the top third of the egg. Rinse the shell, poke a tiny drainage hole in the bottom with a pin, fill with seed-starting mix, and plant.

  Pro Tip: When you’re ready to plant, gently crush the shell in your hand before putting it in the soil to help the roots break through faster.

  Tips for Success:
Watch the Water: Biodegradable pots (especially paper and cardboard) breathe more than plastic. This is great for preventing root rot, but it means they dry out faster.

  Check your soil moisture daily.
Avoid Mold: Ensure good airflow around your pots. If you see a bit of white fuzz on the cardboard, don’t panic—just reduce your watering slightly and increase ventilation.

  Peel the Rim: When planting, make sure no part of the paper or cardboard is sticking out above the soil line. If it is, it can act like a wick, pulling moisture away from the roots and drying out the plant.

  Making your own pots is a small, satisfying step toward a more sustainable garden. Plus, there’s something incredibly rewarding about watching a plant thrive in a vessel you made yourself!