Small vegetable gardening.

I’ve done something a bit different today. To be honest I was hoping it would just show the whole booklet.

It’s 44 pages and feels like it takes forever to download. However that being said, this is good information.

It was put out in 1917 by the United States and Bureau of Plant Industry. Back in a time where the American government actually worked for the people and offered information to help make being self sufficient easier.

At least that is my take on it.

I am working on setting up a food forest, however I will continue to have a garden area as well. It’s amazing the amount of food one can raise, even in a small area.

Even just container gardening can produce an impressive amount of food.

Below is a link to a video about victory gardening. Bare in mind this may not necessarily be for the lazy gardener, however one can adapt these plans, thoughts and ideas to fit their needs. Or so I believe one can.

After you watch the video, come on back and give the booklet a read. Much of the information is dated and you may need to learn what the modern alternatives are.

However if you grow your own food, food shortages at the store won’t hurt you and your family as bad as it would millions of others.

https://archive.org/details/victory_garden

Being able to produce food could well provide a source of extra income to help pay bills or perhaps buy something you’ve been wanting. In any event you’ll save at least money on food.

One could even grow food to donate to those in need if so inclined. The fresh air, fresh wholesome food, exercise and the bacteria in the soil that promotes good mood are just icing on the cake.

Make a garden plan, get some seeds or starter plants and get growing. You’ll be glad you did. The booklet below offers dated information but it’s still solid, you may just need to do a little digging to learn what still works. Some of what they mention will no doubt no longer be available but there will be alternatives.

If your nervous about downloading from a site you may not be overly familiar with, here is a link straight to the source.

https://naldc.nal.usda.gov/catalog/ORC00000267

May your ventures be met with success!

Shag bark hickory trees

Shag bark hickory leaves.

Last year I found a tree growing in my yard, I’m assuming a bird or squirrel dropped the seed it started from. It’s pushing 12′ now. All Summer I’d give it a good long soaking about every week.

After looking into it I figured out it was a shag bark hickory tree.

I had about as many people telling me I should cut it down before it got big as I did telling me it was a good tree to have.

Since I’m trying to get a food forest going, I will let it grow. I have read the nuts are good to eat and have a good taste. I figure any free food is good food and I will learn as much as possible about this tree and it’s uses as possible as time goes by.

The wood from the tree puts out good heat when used as firewood I’ve read. It’s also good for use in the smoker.

It also serves many purposes from making cordage and tool handles to wood working. It also serves as food for wildlife as well as humans

All in all I consider it a win and so far I’m happy to have it as a part of our food forest. I’ve added a couple of links to information you may find useful. And if you do some searching you’ll find plenty more. Your local library or extension office will have information as well. Happy foraging!

Shagbark Hickory Nuts: Harvesting, Cracking and Cooking

https://www.canr.msu.edu/news/shagbark_hickory_another_tasty_local_nut#:~:text=Black%20walnuts%20are%20not%20the,is%20also%20well%20under%20way.

Time for a cold frame?

So anyways the gist of this entry, assuming I can ever finish. My 3 year old helper was pointing out the many, many grammatical mistakes while sitting on my lap and asking if he can fix them while reaching for my key pad. Lol

Starting again on this post, it’s been nearly two years since It was started and I trust my grammar has improved slightly. It’s 4:30am and all of my would be helpers are sound asleep. I’m sure at least some of you can relate.

I not so recently replaced an old wood framed window in the boys room, one pane was cracked but the glass was still together and both frames are in decent condition. I have a ton of old used wood from a 10′ X 20′ foot shed that was taken down because it was in serious disrepair so I’ll be making at least several things with the wood I was able to save.

I’m sure most if not all reading this knows what a cold frame is and many would be far better versed than I to explain how to, or build one, this was my first. And to be honest, it still hasn’t gotten the serious upgrades but it will here before long.

My grandfather had one as I recall and he always had a huge garden’ took up the vast majority of their back yard. I wasn’t familiar with the terminology at the time but I do believe he had a victory garden or some variation of one, if your not familiar with what that is I urge you to research and learn about them.

I personally feel harder times are coming and those that can should grow as much of their own food as possible. If I’m wrong and you end up growing a lot of your own food the worst that will happen is you’ll have more nutritious food and save money plus have the health benefits of home grown food as well as have something to barter with in an SHTF event.

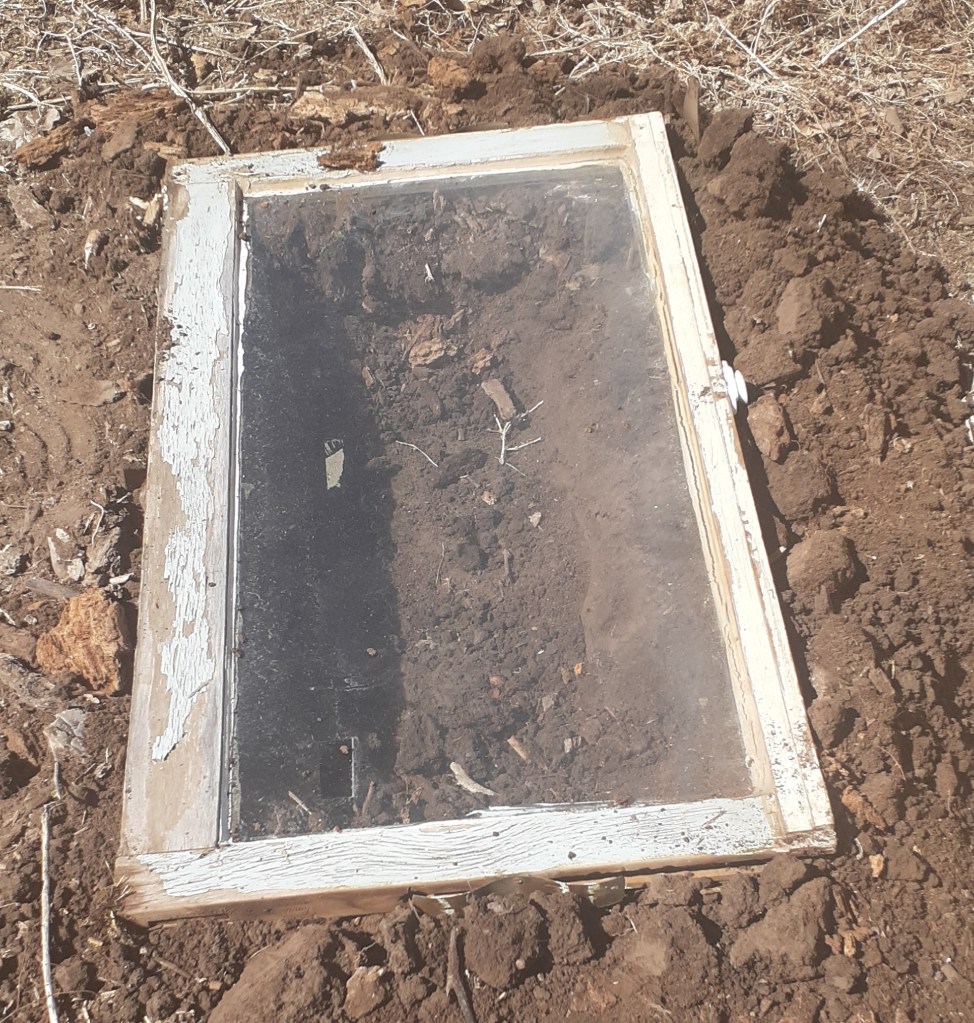
Below is a picture of my first crude cold frame. They are fairly simple in construction but handy to have if indoor space is limited for starting plants.

Also good for hardening plants off as well.

My first attempt.

My first attempt was just a hole dug into the ground with a ledge to set an old window on. It actually works okay, however someone or some critter broke the glass. This season, I will dig it out bigger and deeper. The dirt will be used to make adobe bricks which will hold the glass up off of the ground so it will hopefully not get broken again. I will also be using a bigger window.

If you make a frame out of wood to hold your glass you could potentially move it around and start your plants in place and avoid transplant shock.

The link below is from Mother Earth and should work pretty well, I’ve found other plans and ideas there that are well thought out and work well. If your not well versed with hand tools or don’t have what the plans call for you probably have a friend or family member who is or does. Many things can be had for free if you look around.

Mother Earth is a good source for learning about things around the house and yard and I highly recommend it, if for no other reason than than to have something informative to read.

Seems most have tuned out reality and turned on to social media, my guess is because it’s easier than facing things they feel they have no control over. But it’s just a guess!

I’ve been spending less and less time on social media and more time working on my blog and my fledgling micro homestead. Blogging is my outlet and the extremely micro homestead is my anchor to reality.

I keep wanting more land but find my mastery over what I already have could be better. Always something that needs fixed, cleaned or hauled away or recycled. Anyways, that’s a story for another day.

May your ventures be met with success and your cold frame serve you well for years to come!

https://www.motherearthnews.com/diy/diy-cold-frame-plans-ze0z11zkon/

Dehydrated Food revisited.

Like many I have limited storage space. So I’ve been moving more towards dehydrating  and vacuum packing. There’s advantages in both space saving and longer term storage of produce that would spoil rather quickly in comparison to fresh.

  Early on I posted a little about dehydrating, while I had used a dehydrator for years to make jerky I was pretty green on everything else except banana chips.

  I’m constantly trying and learning new things. I currently have cucumbers, carrots and jalapenos dehydrating, and I will add beets this coming season as well.

Last small batch of jalapenos.

  I decided to grind my last batch of jalapenos to use as seasoning.  You can buy it easily enough but I’m working towards being as self sufficient as possible.

  This was done in a small blender, I ground and chopped until the peppers were a fine powder, I then walked away and allowed the dust to settle for some time before attempting to remove the lid. When I came back I gently lifted the lid off, placed the paper plate over the top of blender container and flipped it upside down onto the kitchen table. Once again, I walked away for some time to allow the dust to settle. Trust me when I say you won’t regret waiting longer than you think you should to let the dust settle. Slow and easy does it.

  If you decide to do jalapenos I’d encourage you to wear rubber gloves as well as watch some videos on youtube or at least talk to someone who has done it. If you breath in the dust or fumes or get them in your eyes or nose you will be very sorry! It’s quite painful and easy enough to avoid.

  That being said I take no responsibility for anything anyone else does. Know what you’re doing, protect yourself with appropriate PPE and be careful!

  Much of what I’m dehydrating I’m grinding into powder. The cucumbers will be kept as chips for snacks or rehydrated for salads and such.

  The carrots and beets will be powdered for a varity of uses. You can easily Google uses for the powders.

Makeshift outdoor dryer for jalapenos.

  For my jalapenos I used a makshift dryer to get them started. After a couple of days of sunshine on a Summer day I find I can finish them indoors with out much issue.

  I have also learned that by leaving the peppers whole they can be dehydrated indoors without a great deal of eye burning. You will no doubt smell them as they dry but it will depend on how sensitive you are to the capsaicin I believe. I personally found it similar to the smell of roasted peppers when I dried my Anaheims.

1 gallon jar of dried anaheim peppers.

  Since I’ve started this I have also dehydrated cilantro and onions.

  Do not, I repeat do not try dehydrating onions in your house! If you fail to heed this warning, you will cry and your entire house and everything within will reak of onion for days, if not weeks. And if you live in an apartment, your neighbors will cry and hate you.

If you want to dehydrate onions I highly suggest you find a place outdoors or in a garage or other shed outside the home to do it in. I personally think they taste better than store bought but make sure to think it through before making your first attempt.

  I will assume if you do this in a garage where you park a vehicle it will smell like onions for some time in said vehicle and you should assume the same, so don’t be upset with me if you cry while driving your car. And yes the smell is that strong and it will hang around.

You may also want to try to do this as far away from others as humanly possible to keep the peace with those living around you.

Best of luck in all your ventures!

Starting seeds

Red solo cup above. Soil block below
Side and top view of 3D printed soil blockers. The left is my modified version.

I’m a bit premature with this one for sure but I’m gearing up to start my seedlings. I waited last season until I was supposed to have. However much of what I started last season from seed failed to produce.

We had a pretty toasty Summer and it just got too hot too fast, so while I had excellent plant growth, they just didn’t set bloom. I don’t know of anyone around here that actually had any real luck with tomatoes.

I did have one cherry tomato plant that went crazy and put on lots of tomatoes. They were good too, I fail to understand the difference. It was around the same size as the rest when I put them all out.

What you see above is what I will be using to start my seeds this year, I figure with the larger sizes I can start them a bit earlier and they shouldn’t get root bound. Or at least I certainly hope not.

The plants for sure will not get root bound with the soil blocks as they air prune. I tried a couple last year but they were not big enough to hold much moisture and dried out pretty quick. I’ve worked on my soil mix and think I have it pretty well figured out. Weather permiting I will use my new improved, larger soil blocker and see what comes of it. Of course it’s snowing here as I write this.

If your not sure when to start your seeds this map may help you.

https://planthardiness.ars.usda.gov/

I do have a flat of beets started already, the reason being is I had put a 50′ row out in the garden and none came up. So I decided to see if my seeds were any good. Almost every one sprouted, so now I have around 60 beets chomping at the bit to be put outside. I’m of course hoping I can keep them going until it’s safe to transplant outdoors.

There are also lots of ways to start your seedlings and no doubt you’ll have tried one or more by now, unless this is your first time growing, most that I have tried have left me wanting for something better to be honest. I’m hoping the soil blocker is all I hope it will be.

It’s a modified design of one I found the stl for on http://www.Thingiverse.com. The latest one I 3D printed is a little over twice as big as the original and I made one that will form two at once.

I’d considered buying a commercial blocker but for my current budget, they’re a bit pricey for now. If I can make money with selling plants then my view may well change.

Along with selling plants and growing a food fotest, I’d like to start a market garden to have a steady income.

Best of luck to you in your ventures, make sure to study up on what your growing, at least a little bit. The more you learn the easier things become.

Recycling tin cans

  I have often seen others questioning how they can best recycle or repurpose their old tin cans. Some of the cans that processed foods come in are aluminum and shouldn’t be a problem to recycle. Though that may depend on the salvage yard you have access to.

  The one that is local to me refuses old oil filters and spray cans, even if crushed or cut and cleaned. While another some 215 miles away considers them number one scrap.

  One claims the smelter refuses them while the other says they will take all I can bring them and will give me top dollar. My guess is education on what is actually considered hazardous waste or dangerous. This is a bit outside the meaning for this post but intended to show that where you live may dictate what, or at least how you’ll be able to recycle.

  I’d suggest you call a few scrap yards if your intentions are to collect cans to sell for scrap, they will likely not pay a great deal if they do buy them but any money for something you’d be throwing away otherwise can’t be bad.

  There are at least a few books out there on working with tin and specifically with tin cans. If you have a creative bent, perhaps you could make things that could be sold for a decent profit.

  Here’s a link to some ideas, it’s loaded with advertising but maybe you’ll find an idea or see something that sparks an idea for you. https://sustainmycrafthabit.com/upcycled-tin-can-crafts/ I have no affiliation with this site.

  I have seen where people remove the tops and bottoms of cans, cut them on the seam and then flatten them out to be used as small shingles and or siding on dog houses or chicken coops. Also the lids can be used in the same way and would look similar to fish scales.

  Not too mention these flattened out bits of metal could be used to make repairs on other sheet metal. In an old farm house I once lived in, someone had used flattened out tin cans to cover mouse holes in cabinet drawers and such.

  I have even seen aluminum cans flattened out and used as shingles, though personally I think it’d be better to cash them in but to each their own.

  One thing I’m wanting to try since getting my anvil is making something along the lines of Damascus steel and forge a knife from some tin cans. It should be noted that cans will have some sort of lining that should be avoided, especially if your heating them in a fire for any reason.

  The best option is too obviously avoid metal canned foods, then no need to recycle and limited exposure to the chemicals used to line the cans.

  Do what works for you! I was going to include the name of the book I bought but can’t for the life of me remember what it was called, and naturally it’s buried in storage which is another topic I’ll tackle on here one day.

New year new beginnings.

  Last year went out with a bang, or perhaps more of a whimper. Spent the last two weeks of 2022 being sick.

  I finally broke down and went to the doctor, still having issues breathing but feeling better.

  I’m starting out the new year with the dehydrator filled to capacity. I found bananas at .39 cents a lb so bought 10 lbs. I also am experimenting with some different vegetables that I haven’t tried before. I figure longer term storage is my goal, along with keeping a full pantry.

  There are a lot of things in the works for 2023 and if I’m going to get half of them done, I’ll need to hit the ground running.

  I will have my live plant dealers license in time for Spring and plan on having at least 1 to 2K worth of plants to offer as well as most if not all of our own plants for the year.

  An industrial size dehydrator is also being built as well as the finishing touches being put on the green house.

  Plants will be started a little earlier this season. Last season it got to hot too soon and the tomatoes that I had started from seed failed to fruit. My starter pots will also be bigger, I’m using the red Solo cups so roots will have plenty of space to grow.

  A fourth compost pile has been started or rather, restarted. When I’d left the other property a little over two years ago the pile was close to four foot high, when I restarted it, it was closer to two foot high. The one pile is for things that will take longer to break down or that would be too hot to use right away. I’m also going to try Vermicomposting again, it was a failure last time and I’m not 100% sure why.

  It’s my hope that I will have plenty of compost to run the greenhouse with. Not sure it will be a money maker for us but being able to grow more of our own food is priceless.

Thank you for stopping by and may you have a fantastic new year!

Growing plants from scraps?

We’ve all seen the srories about re growing plants from left over pieces of produce.

But does it work? I personally have had limited succes trying it, in fact unti only recently I’d had nothing but failures.

But then I found part of a forgotten cabbage way back in the back of the fridge still in it’s original packaging. I’d cut off part of it expecting to use the other half for a meal the next day but plans changed.

While cleaning the fridge I found the lonely cabbage in a terrible state and decided it was headed off to the compost pile.

However on dumping it out I noticed it was just the outside leaves that had turned, the part I’d cut off had all but regrown and there were new roots started at the base of it. So I peeled off the bad part and brought it back in.

After having no luck in the past I decided to try things differently for a change. So I put a little rooting hormone powder on the base, put it in a small flower pot and then into a zip lock bag, letting it drain out the excess water from soaking the dirt first. I don’t think you need rooting hormone, I just happen to have some on hand.

A week later and it’s growing well!

Cabbage from the base and an onion in the back ground.

My new method with a zip lock bag as a mini green house seems to be working well. I even have an onion growning using the same technique.

At first I exhale deeply into the zip lock bag to hopefully give a little CO2 to help growth, make sure to leave a small gap in the zipper part so your plant can breath.

Onion in makeshift mini greenhouse.

I’ve lost count how many times I have tried to grow an onion from the old root part of an onion I’ve cooked but everytime they have dried up or rotted away before growing. This time I actually have some greens growing and roots are growing into the soil as well. I tried to pick up what you see in the picture and the pot lifted up as well.

I will try carrots next using this same method to see it it helps, that is something else I’ve never had any luck with. From what I’ve read the root parts will not make another carrot but they can produce seeds and then there’s the greens so I figure it’s at least worth giving a try.

If you’ve had luck please feel free to share your sucess here or if you’re like me and haven’t had much luck feel free to share that as well.

Best of luck in all of your ventures and may your efforts be met with great success !

Sweat potato leaves

What do sweat potato leaves have to do with anything, your probably thinking. This is the first year I’ve grown sweat potatoes and I’m learning as much as I can about them.

I have them growing in a few places around the yard. As those who have been following along for awhile knows, I’m working on putting together a food forest and the more things I can grow the better off the boys and I will be in the long run.

When I started growing sweat potatoes I didn’t really do much research to be honest, many things I do are spur of the moment and not well thought out or planned unless of course it’s a major purchase or something that will have long term affects around here.

Today I started wondering if the leaves were edible and dug into it a bit and found they are, I’ve read the taste is a bit strong for most and may be better cooked. I took a nibble and found them to be good. Nonetheless the ones I picked today went into a stir fry I had for lunch.

Stir fry steak strips with anaheim pepper, celery, onion, carrot and sweat potato leaves with stems.

The oldest tried some and said it was good, though he picked out some of the veggies.

Here’s a link in case you decide to give the leaves a go, good in salads or so I’ve read. I will give it a try tomorrow.

Yam Leaves, Stir-Fried Sweet Potato Leaves

As always may your ambitions be met with great success!

Fences

It seems everytime I commit to writting more I suffer from writters block. I struggle with what to write about, I tend to prefer writting specifically about things I am doing or have done.

I feel I do a better job writting about what I already know. However I have decided that I can also share information that others know without feeling like a fraud. I started this blog to share information after all.

That being said, I am gearing up to start building a fence on the South side my property. I lost most of what I was growing as an experiment towards my goal of becoming self sufficient this season because a neighboring property was heavily spayed with chemicals.

I can’t put a dollar amount on my loss but it was significant to me. I lost black currants, sage and several other plantings that I had counted on coming back every year. 10 rows of five different kinds of beans that were around 75′ long and one row of beets and two rows of carrots. I decided not to replant because I wasn’t confident there wouldn’t be residual chemical damage or contamination of whatever I replanted.

In any event I’m hoping my fence will at least provide some protection from future events being as drastic.

I have ran miles of barbdwire and built a few wood picket fences, this one will be different from anything else I have done and will benefit us for years to come. The base will be concrete somewhere about 1′ tall and the upper part will be solar panels.

I don’t have pictures or even plans drawn up to be honest but I have fence posts, a post hole digger and enough solar panels to cover about 30′ if I stand them upright, much farther if I lay them on their sides.

Now onto the main reason for this posting. The information I’m wanting to share is on farm fencing, what I have for you is a link to a 62 page booklet on the USD website. While your there you can also browse for other information on a whole host of other topics. Turns out this is a two for one deal, you’ll also find information on bulk storage on the farm.

https://naldc.nal.usda.gov/?f%5Bauthor_facet%5D%5B%5D=Kelley%2C+M.+A.+R.+%28Manly+Alexander+Raymond%29

Happy homesteading and may all your efforts end in success!